
This article is a quick guide on how to install OpenCV onto the Raspberry Pi – the easy way. I will introduce a shell script that will install OpenCV and dependencies without user intervention. Furthermore, I will also introduce GNU Screen so that the OpenCV installation can be done remotely in a Virtual Terminal Session.
Once you start using OpenCV, especially on a Raspberry Pi, you can be installing the camera vision software many times over. For example, worn out SD cards, OS upgrades and OpenCV version upgrades are some of the reasons to cause a new OpenCV installation.
It requires a lot of steps to install OpenCV. First, the package lists are updated. Second, many dependencies and libraries need installation. Then, there are downloading and extracting file operations to complete. And finally, configure, build and install OpenCV.
For most of us, there are too many elements in the install process to remember off-hand. Therefore, some form of a guide is being used to help with the OpenCV install process. So, why not turn an OpenCV install guide into a shell Script. And this is what I have done for this guide.
To keep this guide short I’ll publish the Details and functionality of the OpenCV installation shell script in a separate article. Because otherwise, the guide will become too long. Here, I just want to focus on using the shell script to install OpenCV on to the Raspberry Pi. However, people with experience can read and alter the shell script to fit personal requirements.
Install OpenCV Guide
The shell script uses Adrian Rosebrock’s “Optimizing OpenCV on the Raspberry Pi” guide, but with the addition of C++ support. However, support for Python virtualisation is removed. Anybody requiring the support of Python virtualisation can visit Adrian’s guide I mention above.
While the shell script is running, the script will be logging the install progress to a text file called cv3.3.0_install_log.txt. If there is a command error, the shell script will exit leaving the installation incomplete. Therefore, in this case, check the install log file for the last command executed.
Before continuing to install OpenCV, check the list below to see the requirements.
- Using a minimum 16GB microSD is required.
- The file system is expanded to fill the SD card.
- Enable SSH for remote access.
- Raspberry Pi has good access to the internet during OpenCV installation.
- Optionally, Raspberry Pi has a keyboard, mouse and monitor attached.
- Or, the Raspberry Pi is accessible through SSH remote login.
Use the following guides to setup and configure the Raspberry Pi if necessary:
Raspberry Pi Headless Install Without A Display Guide – Here
Beginners Guide to Raspberry Pi Configuration – Here
GNU Screen
If OpenCV is going to be installed remotely, via SSH login from another computer, I will recommend installing GNU Screen onto the Raspberry Pi. Because, while using a GNU Screen virtual session, the install process will be protected from client PC unplanned disconnects. However, if attaching keyboard, mouse and monitor, GNU Screen can be ignored when using the Raspberry Pi directly.
Install GNU Screen by running the following Command:
Sudo apt-get install screen
Install OpenCV
The install process will be done from the Terminal, so open a Terminal session from the Raspberry Pi to install OpenCV. Run the following commands at the command prompt:
sudo apt-get update
sudo apt-get upgrade
Next, download the shell script from my GitHub account. Use copy and paste if possible to avoid typing the full web address. Also, the address might wrap to the next line due to length.
Wget https://raw.githubusercontent.com/MarkAHeywood/raspberrypi/master/opencv/pi_opencv_source_install_o.sh
Start a GNU Screen session, if installed earlier, at the command prompt:
screen -S opencv
Start the OpenCV installation process by executing the following command:
source pi_opencv_source_install_o.sh
The installation will now start, and the process will take about 3 hours 45 minutes on a Raspberry Pi 3. Hence this instal process runs on one CPU core if on default settings in the shell script.
If the shell script was started in a Screen virtual session, then you can execute the following command to detach from the session. The installation will keep going in the virtual session, but you are now able to exit the Terminal safely. Thus, you can now switch off the client computer to save power. But, leave the Raspberry Pi running to finish the OpenCV installation.
Control a, then d on the keyboard in quick succession.
After the key presses above, you will return to the original Terminal login. However, if this is not the case, you may have pressed the [d] key too slowly after pressing [control-a] on the keyboard.
End Of OpenCV Installation
When you think the OpenCV installation has done, return to the Terminal login as before and enter the following command. This command will reattach you to the Screen virtual session:
screen -r opencv
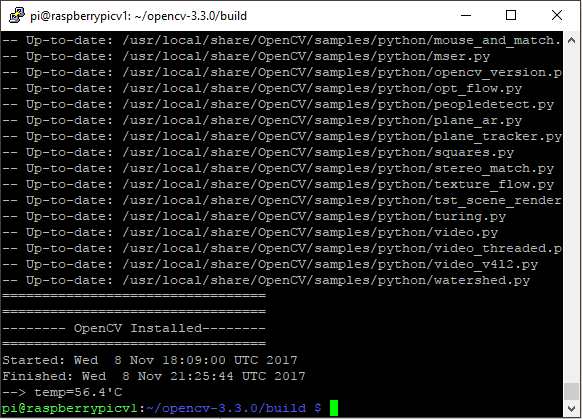
If the installation is successful, a success message will show similar to the above. Therefore, you can check the log file to view time and processor temperatures taken during the installation if desired.
Now that the OpenCV libraries are installed, you might like to try some OpenCV color detection or even object detection:

OpenCV Color Detection and Filtering with Python – Link.
![]()
Object Detection and Tracking with OpenCV and Python – Link.
What Next
Now that you can install OpenCV from a shell script, you might consider using a shell script to automate other Terminal tasks.
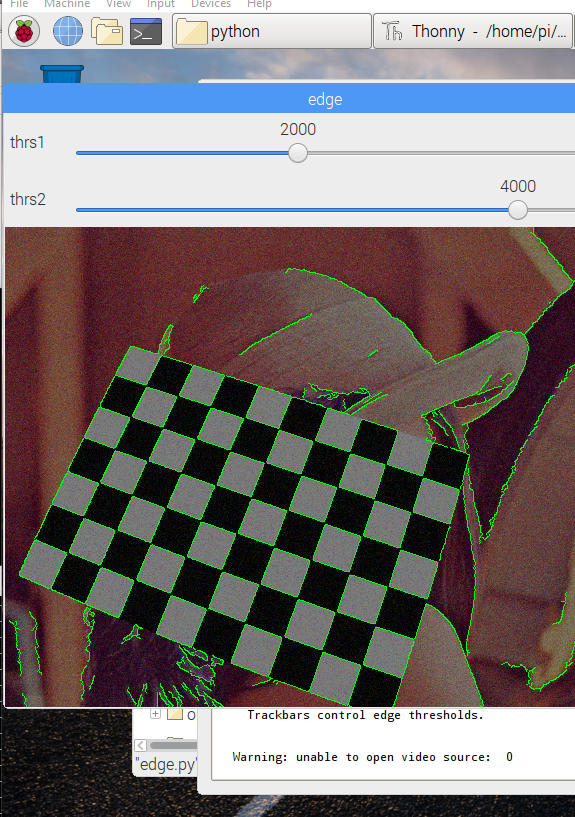
Anyway, there are plenty of Python OpenCV samples to try out. Therefore, access the Raspberry Pi Desktop, either directly or through VNC. Then, open the file browser. The path to the samples will be something like the following:
/home/pi/opencv-3.3.0/samples/python
Then mouse-right-click on any of the files you see such as edge.py. Then select Thonny Python IDE from the pop-up menu. When the code window opens, select Run the current script from the Run menu. And there you have it, Python sample running.
Buying Featured Items
The purchase price is going to vary greatly depending on how quickly you want the items. Therefore shop around checking out Amazon, Ebay, Adafruit and local electronic stores.
UK Searches:
UK Amazon:
US Searches:
US Amazon:
On Closing
I hope you find this article useful – Install OpenCV onto Raspberry Pi from Shell Script, please like and share.
3 thoughts on “Install OpenCV onto Raspberry Pi from Shell Script”
Comments are closed.