
We continue with the Raspberry Pi headless install with the Raspberry Pi Configuration. The Goal here is to set a new password, change the hostname and also to enable some modules. Thus while we are at it, we will update and upgrade as well.
In the last topic, I installed the Raspbian Stretch image on to the Raspberry Pi Zero W. More importantly, this was done without attaching a keyboard or display. Therefore if you have followed the previous guide and successfully made it past the login attempt, you are ready to continue with this Raspberry Pi configuration guide.
Pi Wars
This is part of a series of articles that will go into detail about building a robot that is good enough to compete in the Pi Wars 2018 competition. Select Pi Wars 2018 in Categories from the right panel to list all the articles in the series.
SUDO Prefix Brief
If you are new to the Raspberry Pi or Linux experience you might be thinking what is the sudo prefix. For example, sudo apt-get is a command you might be using a lot from now on.
Since the Raspberry Pi is a development platform, the sudo prefix is available for system developer convenience. Hence no need to switch user or log in as root.
So, by default, your standard username is pi when you log in. Additionally, the user pi has superuser privileges. Therefore you have the power to destroy your Raspberry Pi setup.
However, in order to use your superuser privileges, you have to enable them by using the sudo prefix before a system command. Off course you should only use the sudo prefix for system commands that require it. Not systematically using the sudo prefix will consequently help to safeguard against destroying your Raspberry Pi setup.
Raspberry Pi configuration
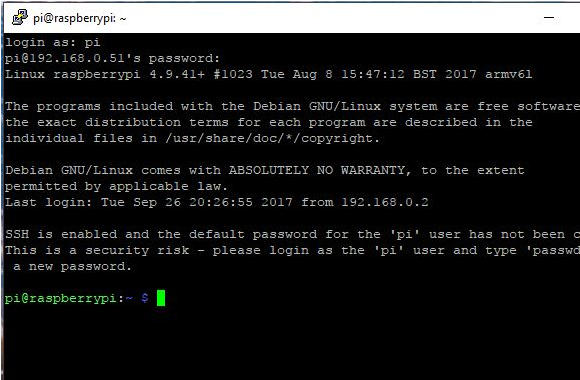
We will start where we left off in the last article. Open a session with PuTTY as before and log in with the default username and password – if unchanged. When you login successfully you should have a screen similar to below.
Note that internet access from the Raspberry Pi is needed for some install and update processes.
Update Raspberry Pi Configuration
Firstly we want to make sure that everything is up to date. So we run the following command in the terminal.
sudo apt-get update
Secondly, we run the upgrade command to download and install the latest packages if available.
sudo apt-get upgrade
Raspberry Pi Configuration Tool
Now that the Raspberry Pi is up to date we now want to do some post install configuration. This means we will personalise the Pi to fit local conditions such as time zone, language and hostname. We also want to unlock some features needed for the Pi Wars robot project.
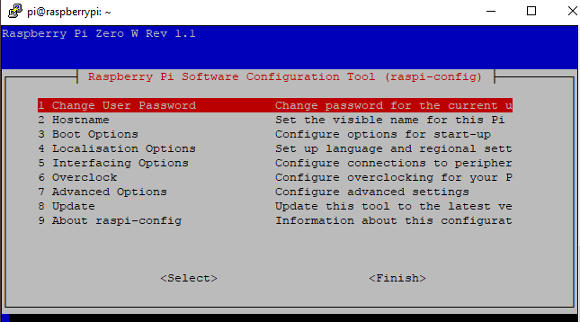
So at the command prompt in the terminal, we run the following command. This will bring up the configuration window similar to above.
sudo raspi-config
With Raspberry Pi configuration tool loaded you can navigate the menu with the arrow keys on your computer keyboard.
Password Update
The password is for the pi login and you can change the default password if you wish. Select the option by highlighting it and then enter. You will then be taken through the simple steps to update the password.
Hostname Update
The default hostname can be reserved for new Raspberry Pi headless installs. Thus allowing you to make an initial SSH connection without knowing the IP address. During the initial connection, a new unique hostname can be given.
So now is the time to change the hostname – while we are in post-install configuration. The hostname you choose could be the name of your Pi Wars robot. Like the password, an easy process to follow to apply the hostname change.
Test Current Changes
If you have made the changes above, close the configuration screen by navigating with the right arrow until you are able to select finish. Now proceed to reboot the Pi. Then try out the new updates.
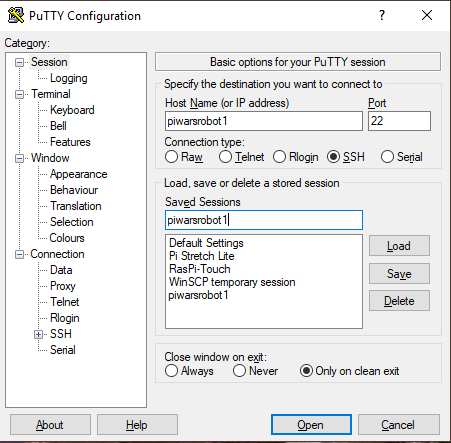
Using PuTTY or preferred application, log in to your Raspberry Pi using the new hostname and password.
Localisation Options

After reboot, return to the Raspberry Pi configuration. Then configure timezone and Language settings in the Localisation sub-menu. Allow time for the option lists to load up when entering timezone and language.
If you did not set the Wi-Fi country in the wpa_supplicant file during the last article, you may want to do so now. Select Change Wi-Fi Country from the menu.
Advanced Options

In this sub-menu, we are just interested in expanding the file system. If you want the Raspberry Pi to use all the space on the microSD card then select the option Expand Filesystem. Confirm to expand file system on the following screen and the setup will be active after a reboot.
Since the Pi is running headless, the other options in the advanced sub-menu may not be needed.
Interfacing Options
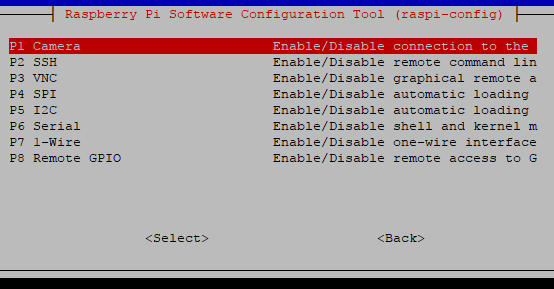
Interfacing options will take you to a sub-menu where you can enable or disable modules. However, SSH we enabled already because it is part of our Raspberry Pi install process. We can just enable the modules as and when we need them. For example, if you want to attach the Raspberry Pi camera you need to remember to come to these settings to enable it.
For the Pi Wars robot build project, I will be looking to use the I2C interface initially. Thus this will be enabled when the time comes. Other useful and popular interfaces include SPI, Serial and 1-wire. So these interfaces are good to keep in mind when looking to attach other connectable circuits to the Raspberry Pi.
To use VNC I believe you will need to install the desktop version of Raspbian. Thus at the moment, I don’t plan to use VNC in the Pi Wars robot, I will probably go headless all the way.
Once you are done, close the Raspberry Pi configuration screen and reboot. That is all for now.
Links to featured
Next Article
On the new Raspberry Pi install I now want an easy way to connect with it. I want to be able to organise files and folders for the Pi Wars Robot Project. So next I will be looking at setting up FTP to use from my computer or laptop.
Related Articles
Raspberry Pi Headless Install Without A Display Guide – Link.
Buying Featured Items
The purchase price is going to vary greatly depending on how quickly you want the items. Therefore shop around checking out Amazon, Ebay, Adafruit and local electronic stores.
UK Searches:
UK Amazon:
US Searches:
US Amazon:
On Closing
I hope you find this article useful – Beginners Guide to Raspberry Pi Configuration, please like and share.
2 thoughts on “Beginners Guide to Raspberry Pi Configuration”
Comments are closed.