
At some point, I’ll be looking to extend my Raspberry Pi robot, and one of the ways to do that is to use I2C (Inter-Integrated Circuit) serial devices. So, in this feature, I look at how to access an Arduino board from the Raspberry Pi using this serial bus. I also include both Raspberry Pi and Arduino code to demonstrate the use of the serial interface.
I think it’s true that the Arduino boards are a much more reliable platform than the Raspberry Pi when comes to timing critical functions. And this is due to the Arduino having onboard peripherals such as Timers, ADC and many more built-in modules. Also, the Arduino microcontroller executes program functions in real-time as opposed to an operating system queueing tasks for execution.
INITIAL TESTING
Using the included example code, I was able to test the performance of both the Raspberry Pi B3 and the Raspberry Pi Zero. However, the example code is still a work in progress, and some tuning is still necessary for the final I2C serial application.
On initial testing, the Raspberry Pi B3 outperforms the Pi Zero by more than a hundred times. And this is measured by the number of failed read methods within the stream. So, the more read methods I perform per second; the more I2C bus errors I get.
Also, while mostly affecting the Pi zero, execution of another process can interrupt the I2C stream and cause increased errors. However, you can use exception handling in the code to prevent your program from crashing. You may need to perform retries until the serial interface returns to normal operation.
Setup and I2C Test Code
The Raspberry Pi is going to need some initial configuration to run the example code. Also, to support the SMBus2 Python library, we need to install some dependencies.
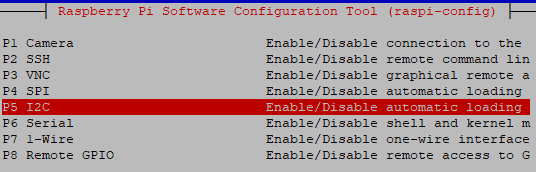
Firstly, we configure the Rasberry Pi to enable the I2C interface. So, open a Terminal session on the Raspberry Pi to execute the following command: sudo raspi-config. The Raspberry Pi Configuration Tool will now open to allow you to select interface options. Then on the next screen, choose I2C to enable the interface.
Secondly, we now install the dependencies required by the SMBus2 library. It appears, at least on my Raspberry Pi setup, I only need to install one package. Therefore, execute the following in the Pi Terminal:
sudo apt-get install i2c-tools
Lastly, we install SMBus2, which is a drop-in replacement for smbus-cffi/smbus-python in pure Python. Enter the following command in the Terminal:
# Either for Python 2.7
pip install smbus2
# Or, for Python 3
pip3 install smbus2
Test Code For I2C
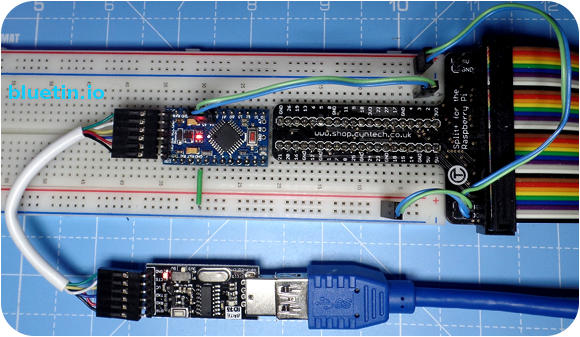
The Circuit
To run the example code, you will need to connect the I2C interface between the Raspberry Pi and Arduino. The Raspberry Pi will have the USB power, while the Arduino has power from the computer USB serial connection. The Arduino is a 3.3v Pro Mini compatible running at 8MHz. And due to the separate power supplies, we need to connect the grounds between the Arduino and Raspberry Pi.
However, this circuit will not be compatible with 5v Arduino board versions. While it is possible to disable the Arduino pull-up resistors, a 5v spike on the I2C is still possible during the pull-up transition.
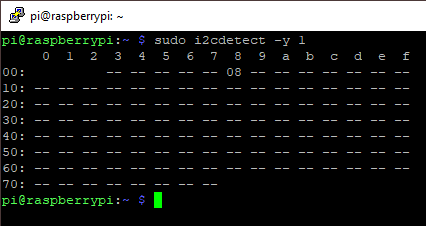
So, to check the correct installation of the software packages, run the following command at the Terminal Prompt. However, you will need the example code uploaded and running on the Arduino. This example code will set the slave address of the Arduino board, and hopefully, this test will detect that address.
sudo i2cdetect -y 1
You should get an output similar to the following:
The Demo Program
The Raspberry Pi operates as the master while the Arduino is the slave device. The process of the program is as below:
The Raspberry Pi uses the SMBus2 read method to get a counter value from the Arduino device. Additionally, after each successful read, the counter on the Arduino is incremented. When the counter reaches 255, the counter is then reset to Zero.
The Raspberry Pi sends an integer called an offset. This offset then allows the Arduino to run an associated function to generate a return value. So, the return value is the counter value and is returned with the offset value. Then, the Raspberry Pi prints both the offset value and the counter value in the Terminal.
The Raspberry Pi I2C Demo Python Code
Copy this program to the Raspberry Pi and run it in the Terminal: .
Adjust the sleep time in the Python code in the case of getting too many serial bus errors.
#!/usr/bin/env python
from time import sleep
from smbus2 import SMBusWrapper
address = 0x08

# Give the I2C device time to settle
sleep(2)

while 1:
    try:
        with SMBusWrapper(1) as bus:
            data = bus.read_i2c_block_data(address, 99, 2)
            print('Offset {}, data {}'.format(data[0], data[1]))

    except:
        print(' Oops! Error')

    # Decreasing delay may create more transmission errors.
    sleep(0.0005)
The Arduino I2C Demo Code
Using the Arduino IDE, upload the code to the Arduino device.
// i2c_slave_test.ino
#include <Wire.h>

#define SLAVE_ADDRESS 0x08

// 10 byte data buffer
int receiveBuffer[9];
uint8_t keepCounted = 0;


// Read data in to buffer, offset in first element.
void receiveData(int byteCount){
  int counter = 0;
  while(Wire.available()) {
    receiveBuffer[counter] = Wire.read();
    //Serial.print("Got data: ");
    //Serial.println(receiveBuffer[counter]);
    counter ++;
  }
}


// Use the offset value to select a function
void sendData(){
  if (receiveBuffer[0] == 99) {
    writeData(keepCount());
  } else{
    Serial.println("No function for this address");
  }
}


// Write data
void writeData(char newData) {
  char data[] = {receiveBuffer[0], newData};
  int dataSize = sizeof(data);
  Wire.write(data, dataSize);
}


// Counter function
int keepCount() {
  keepCounted ++;
  if (keepCounted > 255) {
    keepCounted = 0;
    return 0;
  } else {
    return keepCounted;
  }
}


void setup(){
  Serial.begin(9600); // start serial for output
  Wire.begin(SLAVE_ADDRESS);
  Wire.onReceive(receiveData);
  Wire.onRequest(sendData);
  Serial.println("I2C Ready!");
}


void loop(){
  delay(100);
}
And Finally
So, this is a work in progress and I expect to try other methods from the SMBus2 library also.
Related Articles
Raspberry Pi Headless Install Without A Display Guide – Link.
Beginners Guide to Raspberry Pi Configuration – Link.
Buying Featured Items
The purchase price is going to vary greatly depending on how quickly you want the items. Therefore shop around checking out Amazon, Ebay and local electronic stores.
UK Searches:
UK Amazon:
- Arduino Pro Mini ATMEGA328P – Search
- Raspberry Pi – Search
- MicroSD Card – Search
- Raspberry Pi Compatible Wi-Fi Dongle – Search
US Searches:
US Amazon:
- Arduino Pro Mini ATMEGA328P – Search
- Raspberry Pi – Search
- MicroSD Card – Search
- Raspberry Pi Compatible Wi-Fi Dongle – Search
On Closing
I hope you find this article useful – Using I2C Serial Bus to Connect Raspberry Pi to Arduino, please like and share.