
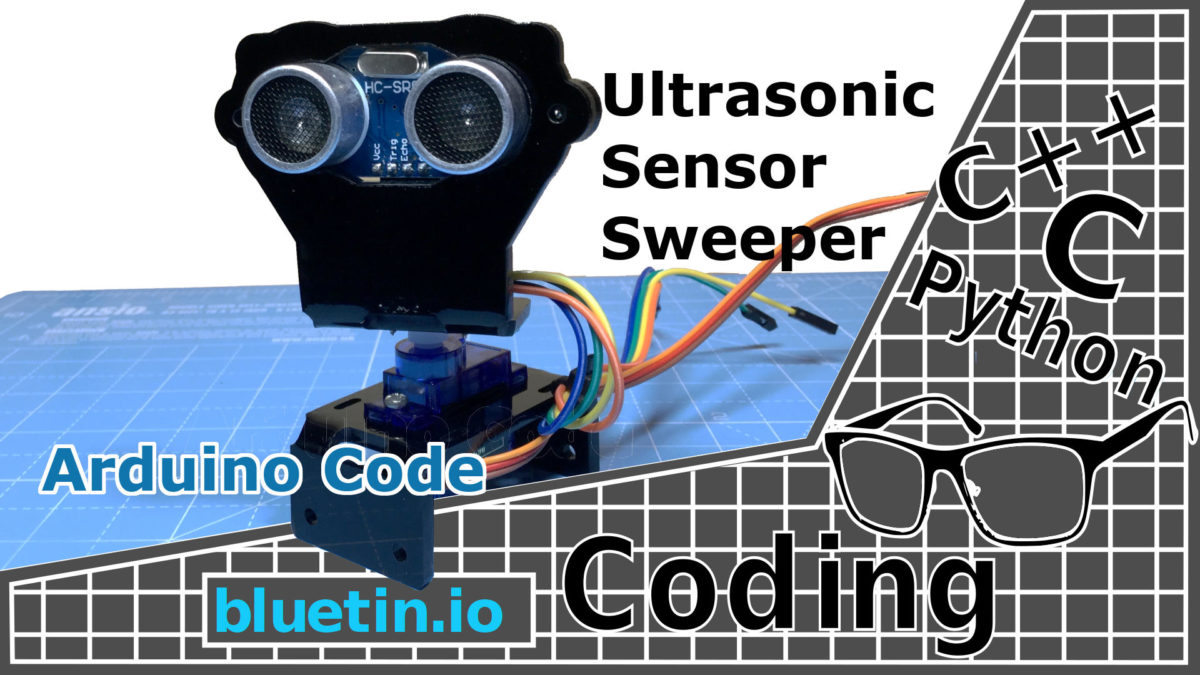
This guide uses the HC-SR04 Ultrasonic Distance Measuring Sensor mounted on a 9g type servo motor. The guide also features the servo and sensor bracket kit that is available to buy. Also, I include the Arduino code that will demonstrate the sensor sweep functionality. To follow this guide you can use any servo and sensor bracket you have to make use of the Arduino code below.
The ultrasonic sensor sweeper I’m presenting here will attempt to detect objects within range of the sensor. Using the servo motor, the sensor will sweep 180 degrees, for example. So, with the Arduino IDE serial terminal open, data will be output to the screen. This data will include servo rotation direction, current servo position, and distance of object detected.
However, the Arduino code is customisable. You can change the behaviour of the sweeping motion and decide what data to output. But, there will be more about the software settings in the Arduino code section below.
Ultrasonic Sensor Sweeper Device Build
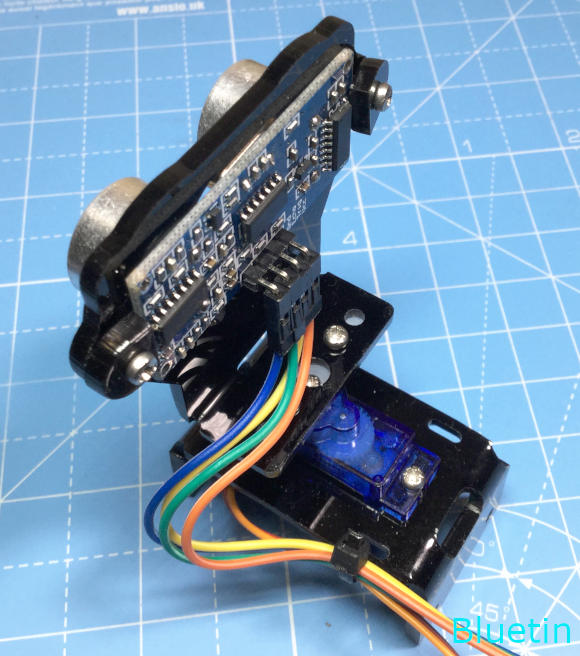
This section describes building a sensor sweeper device. You may have a similar panning device already, including a pan and tilt platform that you can modify to attach an ultrasonic sensor. The bracket I use here is a panning platform with an ultrasonic sensor bracket attached on top.
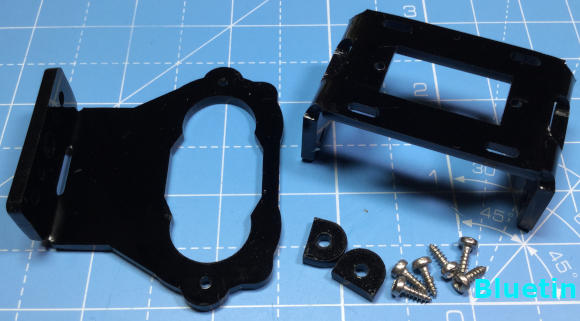
To make the sensor panning platform, I’m using a bracket kit that includes a servo stand and a sensor bracket.
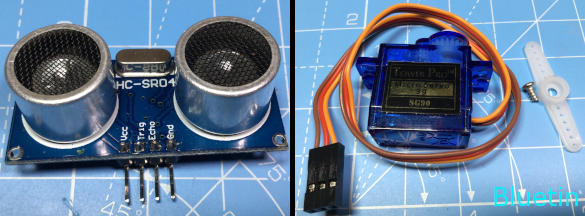
For the Arduino code to work, you require at least one servo motor and one HC-SR04 Ultrasonic Distance Measuring Module. The servo motor stand in the panning platform bracket kit fits the 9g Tower Pro micro servo motor.

You can use a Dupont type four-wire ribbon cable to connect the ultrasonic sensor to an Arduino compatible board. However, you will have to decide which connector type you require to fit the board. So, if connecting directly to an Arduino Uno board, you will need male connectors. The ultrasonic sensor itself has male connectors and so requires female connectors at one end of the ribbon cable.
Preparation

The servo horn we use to attach on to the sensor bracket requires a small modification. So to fit the screws into the servo horn, two holes will have to be enlarged. If you look at the servo horns in the image above, you will see (D) before the modification, and (C) after.
You can enlarge the holes in the servo horn using a 2mm drill bit. A hex shank drill bit (A) will work using your fingers to twist the drill back and forth. Otherwise, the drill bit (B) can be inserted in a power drill to enlarge the holes carefully. You only need to enlarge two holes in the position as you see on servo horn (C).
Building
Here I describe how to build the featured panning bracket kit. Six screws are in this kit and require a good fitting Phillips type screwdriver. The screws are the self-tapping type, and they will screw into the predrilled holes without too much force.
USING THE SCREWS
The self-tapping screws in the featured bracket kit are small and can be fiddly. When using the screws, do not over tighten the screws. Only insert the screws until the screw head makes contact with the material. Over tightening the screws will cause the screw holes to enlarge. If the screw holes become too large, the screw threads will no longer grip with the material.
However, if you do strip a screw hole and make the hole size bigger, try filling the screw hole with hot glue. Then try to insert the screw again.
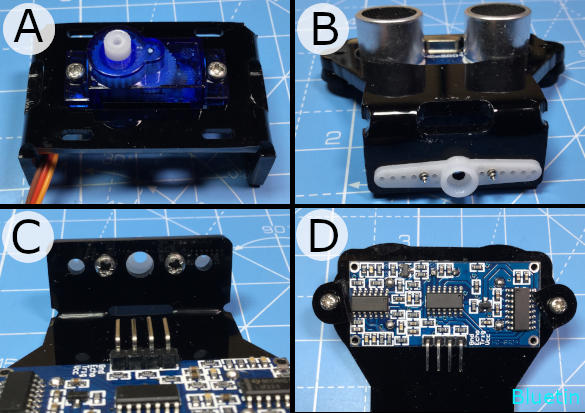
(A) Fit the servo motor into the stand. However, you may have to tip the servo to get the servo wires past the cutout edge. Then insert the screws until the screw head makes light contact on the surface.
(B), (C) After preparing the servo motor horn as described earlier, fit the horn to the bottom of the ultrasonic sensor bracket. Again, only tighten the screws until the servo horn lightly clamps to the bottom of the bracket.
(D), (C) Fit the ultrasonic sensor module to the bracket. Use the “D” shaped washers to lightly hold the sensor board in place. You can turn the plastic washer to get a better hold on the sensor PCB. Be careful not to strip the screw holes when inserting the screws.
Ultrasonic Sensor Cable Management
Unless you know the servo sweep centre position, connect the sensor bracket to the servo without inserting the horn screw. Leaving the screw out now means the sensor rotation position can be adjusted later when the program is running.
However, you can approximate the servo sweep centre by using the sensor bracket to rotate the servo fully anticlockwise. Then, reposition the sensor bracket on the servo where the sensor is looking left. Finally, the servo horn screw can be inserted. The sensor position might still require some fine-tuning once the Arduino program is running.
Connect the four wires to the ultrasonic sensor, then use a cable tie to hold the servo and sensor wires to the servo stand. Make sure the cables have plenty of flex to allow the sensor bracket to rotate freely. If you are using ribbon cable, separate the wires to make the cable more flexible between the sensor and cable tie.
Remember to insert the servo horn screw when you set the desired rotation range of the sensor.
Final Assembly
Before we move onto the Arduino code, the ultrasonic sensor and the servo should be connected to the Arduino board. Here, I will be using an Arduino Uno with a sensor shield.
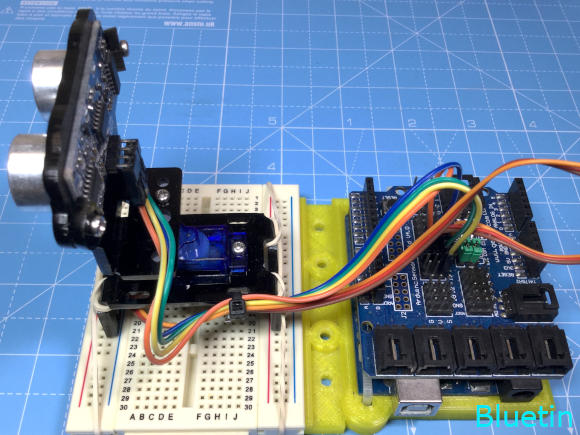
Before we connect the ultrasonic sensor panning platform to the Arduino board, lets clear the board first. So, send the basic blink code to the board to remove any old program that might be using the pins.
The required connections should match the pin configurations in code. So, check the Arduino code to confirm you have connected the wires correctly. The wire connections are as follows:
- Servo ground (Brown) to Arduino ground.
- Serv0 5V (Red) to Arduino 5V.
- Servo signal (Orange) to Arduino pin 9.
- HC-SR04 Sensor ground to Arduino ground.
- HC-SR04 Sensor Echo to Arduino pin 11.
- HC-SR04 Sensor Trig to Arduino pin 10.
- HC-SR04 Sensor 5V to Arduino 5V
For consideration, the sensor sweeper platform is very light, and stiff cables can make placement difficult. To overcome this issue, the servo stand can be anchored down using rubber bands. You can use a spare breadboard or a small book to achieve this.
Arduino Code
After downloading the file to your computer, compile and send the code to your Arduino board the usual way. You can configure the program to change the behaviour of the sensor sweeper. Check the details after the following code block to find out how to change some behaviours.
The GitHub link to the code file is as follows:
/*
 * File: servo_radar_demo.ino
 * www.bluetin.io
 *
 * Guide: https://www.bluetin.io/ultrasonic-sensor-sweeper-servo-arduino-code/
 *
 * MIT License
 * https://github.com/MarkAHeywood/bluetin/blob/master/ultrasonic-sensor-sweeper-servo-arduino-code/servo_radar_demo.ino
 */

#include

Servo panServo;

//---------- Ultrasonic Sensor Pin Configuration -------------
const uint8_t ECHO_PIN = 11;
const uint8_t TRIGGER_PIN = 10;

//---------- Servo Pin Configuration -------------
const uint8_t panServoPin = 9;

//---------- Adjust the following to fit servo limit. ----------
const int panLimitMin = 550;
const int panLimitMax = 2400;
const int panServoCentre = 1450;

//---------- Other Constant ----------
const long servoDelayTime = 50000; // Delay (micros) between servo moves (rotation speed).
const int stepSize = 20;
const int sensorTimeout = 17493;  // Microseconds

//---------- Values we want to keep track of throughout the program. ----------
long servoTimestamp = 0;
bool servoDirectionClockwise = true;
int panPosition = 0; // Microseconds, with initial servo pan position.

//========== Functions ===========

uint16_t echo(bool isCM) {
  long echoDuration;
  long distance;

  digitalWrite(TRIGGER_PIN, LOW);
  delayMicroseconds(2);
  digitalWrite(TRIGGER_PIN, HIGH);
  delayMicroseconds(5);
  digitalWrite(TRIGGER_PIN, LOW);

  echoDuration = pulseIn(ECHO_PIN, HIGH, sensorTimeout); // Returns microseconds
  //echoDuration = pulseIn(ECHO_PIN, HIGH); // Returns microseconds

  if (isCM) {
    // Distance in cm conversion.
    distance = echoDuration / 29 / 2; // 29.15 microseconds per cm
    /*
    Serial.print(distance);
    Serial.println("cm");
    */
  } else {
    // Distance in inches conversion.
    distance = echoDuration / 74 / 2;
    /*
    Serial.print(distance);
    Serial.println("in");
    */
  }
  //delay(1);
  return distance;
}


bool servoControl() {
  bool panPositionUpdate = false;
  if (micros() > (servoTimestamp + servoDelayTime)) {
    if (servoDirectionClockwise == true) {
      panPosition = panPosition - stepSize;
      if (panPosition < panLimitMin) {
        servoDirectionClockwise = false;
      } else {
        panPositionUpdate = true; // Update servo position
      }
    }

    if (servoDirectionClockwise == false) {
      panPosition = panPosition + stepSize;
      if (panPosition > panLimitMax) {
        servoDirectionClockwise = true;
      } else {
        panPositionUpdate = true; // Update servo position
      }
    }

    if (panPositionUpdate == true) {
      panServo.writeMicroseconds(panPosition);
      servoTimestamp = micros();
      //Serial.println(panPosition);
    }
  }
  return panPositionUpdate;
}

//========== Main Functions ==========

void setup() {
  Serial.begin(115200);
  // Configure pins.
  pinMode(TRIGGER_PIN, OUTPUT);
  pinMode(ECHO_PIN, INPUT);
  panServo.attach(panServoPin);
  panPosition = panServoCentre;
  panServo.writeMicroseconds(panPosition);
  servoTimestamp = micros();
}


void loop() {
  if (servoControl() == true) { // Has the servo position updated?
    // Get distance update.
    uint16_t distanceCM = echo(true); // Report in cm = true.
    Serial.print("Rotation Clockwise: ");
    Serial.print(servoDirectionClockwise);
    Serial.print(", Servo Position: ");
    Serial.print(panPosition);
    Serial.print(", Distance: ");
    Serial.print(distanceCM);
    Serial.println("cm");
  }
}
Code Configuration
The following code snippets are the lines of code you can change to alter the behaviour of the sensor sweeper.
SERVO CONTROL
//---------- Adjust the following to fit servo limit. ----------
const int panLimitMin = 550;
const int panLimitMax = 2400;
const int panServoCentre = 1450;
You can adjust the servo sweep distance limits by adjusting the above constant variables. Additionally, you can set the servo starting point after servo initialisation. However, be careful not to adjust these values to cause the servo to rotate against the servo’s physical limits. If you try to rotate the servo beyond the physical limits, the servo motor will stall and draw extra current.
The above values are a good starting point that is tested on with the Power Pro 9g micro servo. These values are a range in microseconds that are passed to the servo library.
//---------- Other Constant ----------
const long servoDelayTime = 50000;
const int stepSize = 20;
You can adjust the servo rotation speed by adjusting the servo delay time. The delay time is the number of microseconds that will pass before each servo move. Reducing this value will increase the servo rotation speed.
The microsecond value the program sends to the servo library is incremented up or down, depending on the current rotation direction. You can change the step size of the increments to adjust how far the servo moves per step update. If you increase this value, you decrease the number of ultrasonic sensor reads per servo sweep.
ULTRASONIC SENSOR CONTROL
//---------- Other Constant ----------
const long servoDelayTime = 50000; // Delay (micros) between servo moves (rotation speed).
const int stepSize = 20;
const int sensorTimeout = 17493;  // Microseconds
Adjusting the servo motor constants will also impact the ultrasonic sensor read performance. When running the Arduino code as it is, an ultrasonic sensor read will happen on each servo position update. So, changing the servo rotation speed or the servo step size will alter the speed and quantity or reads per sensor sweep. For example, increasing the servo step size will reduce the number of ultrasonic sensor updates per servo sweep.
Adjusting the sensor timeout can affect the overall performance of the program. If you don’t want to detect objects more than a metre away from the sensor, you can reduce the timeout value to reflect that.
You can calculate the timeout as follows:
timeout = 29.15 x cm x 2
Use the result without the values after the decimal point.
Improving The Ultrasonic Sensor Sweeper Program
You can alter the Arduino code as you wish. As an exercise, some of the following features can be implemented into the code.
- Output servo position in degrees of rotation to the user.
- Detect the approximate width of a detected object as well as the distance. Then output the result.
- Set up the Ultrasonic sensor as an object guard. Detect when an object is removed. Additionally, a sounder can be added to the Arduino to create an audible alarm.
- Monitor opening and closing of doors with the sensor sweep range.
Related ARTICLES
Ultrasonic HC-SR04 Sensor Python Library for Raspberry Pi GPIO – Link.
360 Degree Mod for Servo Continuous Rotation – Guide – Link.
SHOPPING
DISCLAIMER: This feature may contain affiliate links, which means that if you click on one of the product links, I’ll receive a small commission. This commission helps support the website and allows me to continue to make features like this. Thank you for the support!
Banggood – Usually fast shipping from China.
- Geekcreit® Ultrasonic Module HC-SR04 Distance Measuring Ranging Transducer Sensor DC 5V 2-450cm – Link.