
Here, we look at the 28BYJ-48 stepper motor with the ULN2003 driver. We get familiar with the specifications and the wire connections for driving the stepper motor from an Arduino microcontroller. Also, I include Arduino code to drive the 28BYJ-48 stepper motor without installing any additional libraries.
You might use this stepper motor for projects where you do not need any real accuracy, torque and speed. However, since the stepper motor has a built-in reduction gear, there is useful torque to exploit. Consequently, this reduction gear reduces the output shaft rotational speed. In regards to accuracy, this is by driving the 28BYJ-48 windings to rotate in steps. So, the accuracy will depend on the output shaft load, the driver and the power supply. Because once the stepper motor starts missing steps, you lose precision. The quality of the stepper motor may also be a factor in any accuracy issues.
28BYJ-48 stepper motor Verses DC Motor and Servos
Some of the advantages of using the 28BYJ-48 over DC motors and servos include the following:
- Unlike DC motors and servos, the stepper motor is almost silent. Therefore, the stepper is useful for driving display turntables and surveillance camera panning platforms.
- The stepper can potentially provide more motion increments per full output rotation. Therefore, smooth sensor sweeps at a consistent low speed is possible. In contrast, servos have fewer increments per rotation. Rotation sweep distance will also be less without servo modification.
- The stepper motor is positional control ready, and this will help with object tracking. For example, camera vision and distance measuring sensors are ways to do object tracking. DC motors will have to have extra circuitry and components to achieve positional control like the stepper motor.
If you are looking for rotation with positional control but don’t need the power of a servo or the speed of the DC motor, then the stepper motor I feature here is worth a look.
28BYJ-48 Specifications And Connections
There are variations of this stepper motor available so you should check the datasheet associated with your motor at the supplier.
Some 28BYJ-48 details from the Datasheet:
- Number of phases 4
- Speed variation ratio 1/64
- Stride angle 5.625/64
- Frequency 100Hz
- 5 Volt input
- The stepper draws between 120 to 250mA at peaks on testing.
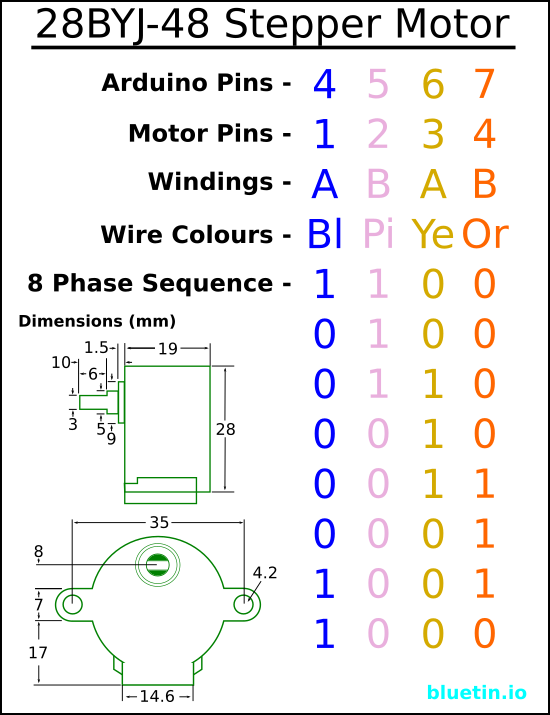
In regards to the above illustration, the Arduino pin assignments are optional. Although, I will use the above pin assignments in the code below. Furthermore, I’ll be using Arduino port access programming techniques to access these pins. You can learn more about Arduino device port manipulation in this article.
Arduino and 28BYJ-48 Connection
Connecting the stepper motor to the Arduino board is easy. Six jumper cables are all you need to connect the driver board to the Arduino board.
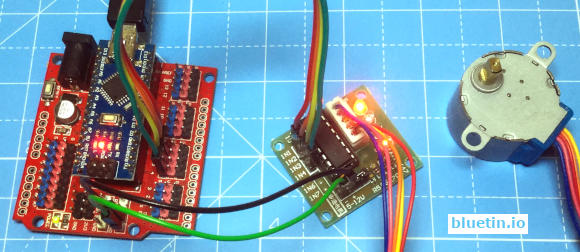
To demonstrate, the image above shows my test circuit. So, you can see that the circuit uses an Arduino Nano that I plug into a breakout board. Since I’m using the 5-volt version of the stepper motor, the driver board can take power from the Nano breakout. Additionally, the breakout board has an alternate power supply input when you require more power for additional motors.
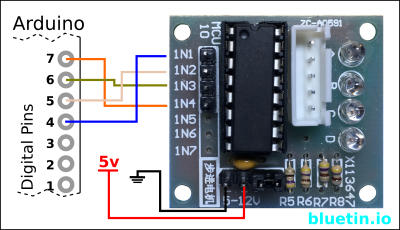
The connections you see in the image above fits the stepper phase sequence I apply in the example code below. Therefore, Arduino digital pin 4 connects to pin IN1 on the 28BYJ-48 driver. Then pin 5 to IN2, pin 6 to IN3 and pin 7 to IN4. Finally, for power supply, the Arduino 5-volt and ground pins connect to the supply pins on the driver board.
As long as you only have one motor attached, the Arduino USB cable will be enough to provide power supply. Else, you will require additional supply to power the attached motors.
Arduino Code Example For Driving The 28BYJ-48
The Arduino example program is all you need to drive the stepper motor with basic features. These basic features include changing the step direction and changing step speed. So, the two variables below from the program is where you can alter the direction and speed.
long timeInterval = 2000; // microseconds
bool rotateDirection = true;
Changing Parameters
The rotation direction can either be true or false, where true equals clockwise rotation on the shaft. For the speed, however, this is a long integer value. So, any value below 1200 will provide the fastest rotation with reduced torque. And values above 1200 will slow the rotation speed and may increase torque. This value represents microseconds between steps and going too low will stall the 28BYJ-48 motor.
State Machine
To add flexibility to the Arduino program, I’ve implemented a state machine using a timer function. I use the timer so that I execute the stepper routines only when it is time to do so. Consequently, this allows the main loop of the program to continue running between stepper motor steps. You can then include other methods like the following:
- Check for a limit switch at intervals between stepper steps.
- Process results from a distance measuring sensor.
- Read a potentiometer as a way to alter the step speed interval.
- Process other inputs and outputs including updating a display or receiving serial input.
28BYJ Example Arduino Program
After saving the program to a local folder, open in the Arduino IDE. Then upload the program to the Arduino device to run.
/*
 * File: stepper_28byj_48_slim.ino
 *
 * 28BYJ-48 stepper motor using the ULN2003 interface normally
 * supplied with this stepper.
 *
 * Simple 28BYJ-48 Stepper Driver
 * Version 0.01
 * Last Edit: 15/11/2018
 *
# MIT License
#
# Copyright (c) 2018 Mark A Heywood
# Author: Mark A Heywood
# https://www.bluetin.io/
#
# Permission is hereby granted, free of charge, to any person obtaining a copy
# of this software and associated documentation files (the "Software"), to deal
# in the Software without restriction, including without limitation the rights
# to use, copy, modify, merge, publish, distribute, sublicense, and/or sell
# copies of the Software, and to permit persons to whom the Software is
# furnished to do so, subject to the following conditions:
#
# The above copyright notice and this permission notice shall be included in
# all copies or substantial portions of the Software.
#
# THE SOFTWARE IS PROVIDED "AS IS", WITHOUT WARRANTY OF ANY KIND, EXPRESS OR
# IMPLIED, INCLUDING BUT NOT LIMITED TO THE WARRANTIES OF MERCHANTABILITY,
# FITNESS FOR A PARTICULAR PURPOSE AND NONINFRINGEMENT. IN NO EVENT SHALL THE
# AUTHORS OR COPYRIGHT HOLDERS BE LIABLE FOR ANY CLAIM, DAMAGES OR OTHER
# LIABILITY, WHETHER IN AN ACTION OF CONTRACT, TORT OR OTHERWISE, ARISING FROM,
# OUT OF OR IN CONNECTION WITH THE SOFTWARE OR THE USE OR OTHER DEALINGS IN
# THE SOFTWARE.
 */


//+++++++++++ Variables +++++++++++++++
// Track current stepper phase by index
int phaseIndex = 0;

//++++++++++++++ Initialise Constants ++++++++++++++++
// Stepper port pin assignment. Default 0b11110000 on port D.
const uint8_t STEPPERPORT = 0xF0;
// Serial port pins mask for port D.
const uint8_t SERIALMASK = 0x03;
// Motor 8-phase sequence lookup list
// pins 7, 6, 5, 4 (0011, 0010, 0110, 0100, 1100, 1000, 1001, 0001)
const uint8_t STEPPERPHASES8[8] = {0x30, 0x20, 0x60, 0x40, 0xC0, 0x80, 0x90, 0x10};
//+++++++++++++++++++++++++++++++++++++++++++++++++++++++

void phase8 (bool isClockwise) {
  // Clear stepper pins
  PORTD = PORTD & SERIALMASK;

  // Alter rotation direction
  bool rotateDirection;
  if(isClockwise == true) {
    rotateDirection = true;
  } else {
    rotateDirection = false;
  }

  if (rotateDirection == true) {
    // Output the next stepper phase - Clockwise
    PORTD = PORTD | STEPPERPHASES8[phaseIndex];
    if (phaseIndex == 7) {
      phaseIndex = 0;
    } else {
      phaseIndex++;
    }
  } else {
    // Output the next stepper phase - Counter Clockwise
    PORTD = PORTD | STEPPERPHASES8[phaseIndex];
    if (phaseIndex == 0) {
      phaseIndex = 7;
    } else {
      phaseIndex--;
    }
  }
}


void setup() {
  // Set stepper pins to output
  DDRD = DDRD | STEPPERPORT;
}


long timeNow;
long timeInterval = 2000;
bool rotateDirection = true;
long savedTime = micros();

void loop() {
  timeNow = micros();
  if (timeNow - savedTime > timeInterval) {
    phase8(rotateDirection);
    savedTime = micros();
  }
}
28BYJ-48 – What Next?
You can extend the program by adding a function that will cause a sweeping motion on the stepper motor output. This sweeping motion will be useful for a scanning application using an ultrasonic distance sensor.
RELATED ARTICLES

GPIO PWM For Raspberry Pi H-Bridge DC Motor Control – Link.
TB6612FNG Dual DC Motor Driver and Arduino Circuit guide – Link.
SHOPPING
DISCLAIMER: This feature may contain affiliate links, which means that if you click on one of the product links, I’ll receive a small commission. This commission helps support the website and allows me to continue to make features like this. Thank you for the support!
Banggood
Banggood provides faster shipping than ebay.
- 28BYJ-48 DC 5V 4 Phase 5 Wire Stepper Motor With Driver Board – Link.
- Arduino Nano Multifunction Expantion Board – Link
- Arduino Compatible Nano V3 Module – Improved Version – Link.
On Closing
I hope you find this article useful – 28BYJ-48 Stepper Motor With Arduino Code Driver, please like and share.