
Featuring the SSD1331 display and the Python Pillow library, I create and test content on the PC before porting to the Raspberry Pi with the attached OLED screen. Also, I include Truetype FreeFont and graphic images as part of the setup and demonstration. Additionally, I include plenty of example Python code.
This article explores a workflow we can use to create small display content using the Pillow (PIL Fork) and Luma.OLED Python libraries. We want to create display content and Python code initially on the PC before transferring to the Raspberry Pi with the attached small display.
We look at ways to make our Python code and small display content more portable between the PC and Raspberry Pi. This Portability will make it more convenient to experiment with different display designs and functionality before uploading to the Pi board. Also, by doing the initial development on the PC, we minimise the wear of the Raspberry Pi SDCard.
So, instead of using the Luma-OLED Pillow-compatible drawing canvas, we are going to interact directly with the Pillow library. And since other display libraries also use the Python Image Library, our Raspberry Pi small display project becomes even more portable.
Installing and Using the Pillow Library
Some personal computer OSs and devices such as the Raspberry Pi will include some of the required software already. So, it will be a case of installing the missing software. Furthermore, if you plan to use text in the display, check down below about using Truetype fonts.
I assume you have some experience installing and working with Python. And you can also install python packages to boot.
Software Setup Including the Pillow Library
On all the systems and devices you will need to have the following software installed:
- A version of Python you want to work with, ideally, use the same version on PC and the Raspberry Pi for instance.
- The Pillow library, a PIL fork (Python Image Library).
- Python virtual environment in the case of Mac and Linux – if setup.
For the devices that will have the small display attached such as the OLED SSD1331, the following software is required.
- An install of the Luma-OLED library or other Pillow compatible library.
The following guides will help with installing the Luma-OLED library and setting up Python in windows:
OLED Display Library Setup for the Raspberry Pi featuring SSD1331 – Link.
Python and OpenCV Setup on Windows 10 with Geany Text Editor – Link.
If you want to know more about python virtualisation, visit the following guide:
Isolated Python Environment Guide – Virtualenv-Wrapper – Link.
INSTALLING THE PYTHON IMAGE LIBRARY
I’m using the Pillow library which is a fork of PIL. The install guide in the library documentation will guide you to installing the library for most systems. So, visit this install guide if you’re not sure how to install the library on your system:
- Pillow (Pil Fork) installation documentation – Link.
In most cases you will likely only need the following command to install the library:
# Pillow >= 5.0.0 supports Python versions 2.7, 3.4, 3.5, 3.6
# For python 2.7
pip install Pillow
# Or for Python 3.*
pip3 install Pillow
Using Fonts with the Pillow Library
At some point, you’ll want to use text on the OLED or LCD. If you’re developing your display content directly on the Raspberry Pi, you might not see an issue with text fonts. However, if you are developing display content on two separate computer platforms, you might discover that your chosen font is not available on both platforms.
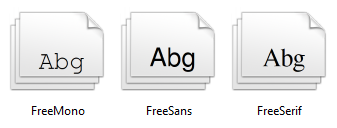
So, to have some font consistency across your platforms, you can install Truetype FreeFonts. The Raspberry Pi OS (desktop) has FreeFonts installed already, and Pillow will find these without adding the full path in the code.
Windows OS, however, will not have these FreeFonts, but you only need to copy these fonts to the C:\Windows\Fonts directory. Check the install guide for other platforms.
- Download the FreeFonts from here.
Truetype FreeFont List
- FreeMono, FreeMonoBold, FreeMonoBoldOblique, FreeMonoOblique
- FreeSans, FreeSansBold, FreeSansBoldOblique, FreeSansOblique
- FreeSerif, FreeSerifBold, SansSerifBoldItalic, FreeSerifItalic
Using the Pillow Library Demo Code
For a simple test, I will compare two code snippets. One code snippet to run on the PC and the other to run on the Raspberry Pi. Additionally, the Raspberry Pi will have the OLED display attached using the Luma-OLED library. Furthermore, if you have installed the FreeFont as above correctly, this simple test will confirm the installation. So, the output on the PC and the Raspberry Pi should look identical.
The Python code snippets below will use the Pillow library to create content containing a rectangle border and some text. So, if you compare both code snippets, the Pillow library code is not affected during the code transition from PC to Raspberry Pi. Therefore, making the code portable between different computer platforms.
FREE GRAPHICS SOFTWARE
To modify or create images for your displays there are free graphics applications you can use.
- GNU Image Manipulation Program (GIMP) – here.
- Inkscape is a professional vector graphics editor – here.
CODE TO OUTPUT TO PC SCREEN
This code excludes the SD1331 display library by commenting out. Also, the Python code will pass the output to the PC image preview with the following line: image.show()
# text-content-to-pc.py
from time import sleep

from PIL import Image
from PIL import ImageDraw
from PIL import ImageFont
'''
# Import Luma.OLED libraries
from luma.core.interface.serial import spi
from luma.oled.device import ssd1331
# Configure the serial port
serial = spi(device=0, port=0)
device = ssd1331(serial)
'''
frameSize = (96, 64)

def main():
    image = Image.new('RGB', (frameSize), 'white')
    font = ImageFont.truetype("FreeMonoBold.ttf", 12, encoding="unic")
    draw = ImageDraw.Draw(image)

    draw.rectangle([(1,1), (frameSize[0]-2,frameSize[1]-2)], 'black', 'white')
    draw.text((5, 5), 'Hello World', fill='white', font=font)
    '''
    # Output to OLED/LCD display
    device.display(image)
    '''
    # Output to PC image viewer
    image.show()

    sleep(5)

if __name__ == "__main__":
    main()
CODE TO OUTPUT TO THE SSD1331 OLED DISPLAY
This code includes the SD1331 display library and also the following to output the text to the OLED display device.display(image).
# text-content-to-ssd1331.py
from time import sleep

from PIL import Image
from PIL import ImageDraw
from PIL import ImageFont

# Import Luma.OLED libraries
from luma.core.interface.serial import spi
from luma.oled.device import ssd1331
# Configure the serial port
serial = spi(device=0, port=0)
device = ssd1331(serial)

frameSize = (96, 64)

def main():
    image = Image.new('RGB', (frameSize), 'white')
    font = ImageFont.truetype("FreeMonoBold.ttf", 12, encoding="unic")
    draw = ImageDraw.Draw(image)

    draw.rectangle([(1,1), (frameSize[0]-2,frameSize[1]-2)], 'black', 'white')
    draw.text((5, 5), 'Hello World', fill='white', font=font)

    # Output to OLED/LCD display
    device.display(image)
    '''
    # Output to PC image viewer
    image.show()
    '''
    sleep(5)

if __name__ == "__main__":
    main()
Adding Graphics Using The Pillow Library
The following demos will now just use a single code snippet edited for personal computer output. Use the example code above as a guide to modifying the code for either PC screen or OLED/LCD output.
Now, we look at a further two Pillow library examples that involve loading or adding images to the display. On the first example, the code will show how to load a JPEG image file. Furthermore, the second example will explain how to load an image and paste it on to the canvas.
You can supply self-sourced JPEG images for the following code, just alter the file names.

The first logo represents the Geany text editor – here. And then, of course, the Python logo- here.
Loading JPEG Image With The Python Pillow Library
The following Python code Snippet opens a JPEG image file that is the same size as the OLED display. The image is then output to the screen.
#jpeg-image-load-test.py
from time import sleep

from PIL import Image
'''
# Import Luma.OLED libraries
from luma.core.interface.serial import spi
from luma.oled.device import ssd1331
# Configure the serial port
serial = spi(device=0, port=0)
device = ssd1331(serial)
'''
# SSD1331 display size
frameSize = (96, 64)

def main():
    filename = "geany-logo-oled.jpg"
    # Open image file
    image = Image.open(filename)
    '''
    # Output to OLED/LCD display
    device.display(image)
    '''
    # Output to PC image viewer
    image.show()

    sleep(10)

if __name__ == "__main__":
    main()
Pasting a Smaller image on to the Pillow Library Canvas
This example code creates a canvas the same size as the OLED display. Then, a small JPEG image is then loaded and pasted on to the canvas at a position set in code. Finally, the Pillow library canvas is output to the screen.
#jpeg-image-paste-test.py
from time import sleep

from PIL import Image
'''
# Import Luma.OLED libraries
from luma.core.interface.serial import spi
from luma.oled.device import ssd1331
# Configure the serial port
serial = spi(device=0, port=0)
device = ssd1331(serial)
'''
# SSD1331 display size
frameSize = (96, 64)

def main():
    # Create RGB canvas to put content on
    image = Image.new('RGB', (frameSize), 'white')
    filename = "python-logo-oled.jpg"
    imageClip = Image.open(filename)
    imageSize = imageClip.size
    cX = 10
    cY = 10
    image.paste(imageClip, (cX, cY, cX+imageSize[0], cY+imageSize[1]))
    '''
    # Output to OLED/LCD display
    device.display(image)
    '''
    # Output to PC image viewer
    image.show()

    sleep(5)

if __name__ == "__main__":
    main()
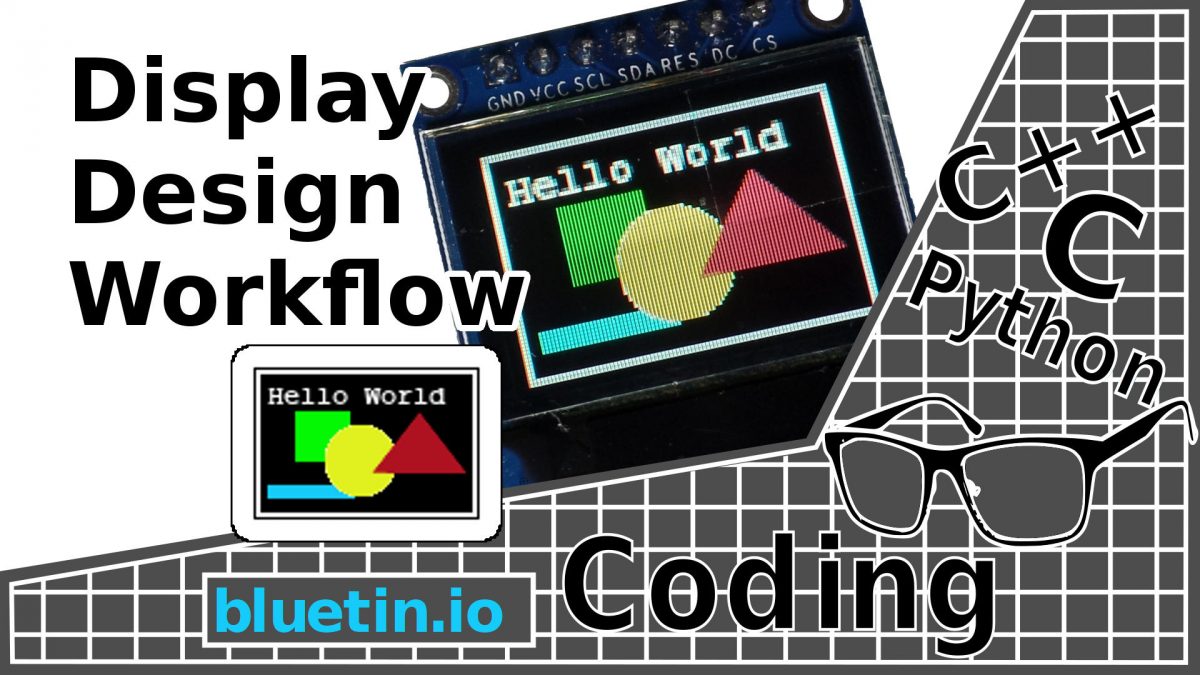
Using PNG Images With Alpha Channel
Finally, we load multiple images to create a more complex display. I’m using PNG images to make use of the alpha channel so the image background will appear transparent.
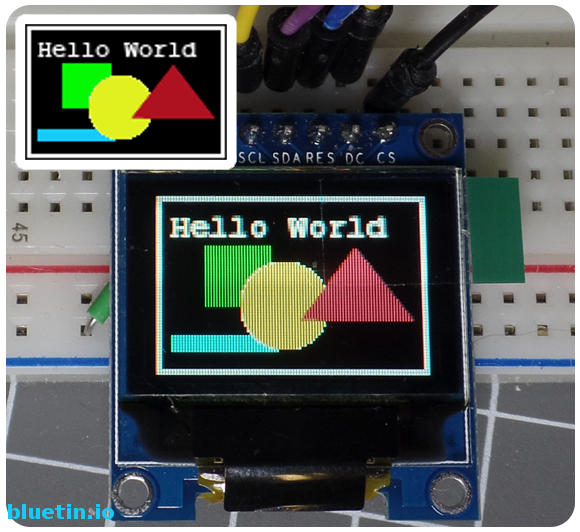

This Python demo code demonstrates how to use clipart to build a more complex display. The Python code makes the OLED display more dynamic as opposed to having whole screens designed for every scenario. So, if you are looking to do a weather forecast display, you can dynamically combine different weather symbols to create a unique weather forecast picture.
To run the code snippet on your chosen platform, you will need the Truetype FreeFont installed. Additionally, you will need to supply PNG images with the alpha channel included. Change the file names in the code to the images you want to provide.
'''
image-content-pc-oled.py
Luma.OLED library imports and methods
commented out for output to PC.
'''

from time import sleep

from PIL import Image
from PIL import ImageDraw
from PIL import ImageFont
# Import Luma.OLED libraries
'''
from luma.core.interface.serial import spi
from luma.oled.device import ssd1331
# Configure the serial port
serial = spi(device=0, port=0)
device = ssd1331(serial)
'''
# Frame size must match the OLED display size
frameSize = (96, 64)

def main():
    # Setup a new image canvas with alpha channel.
    image = Image.new('RGBA', (frameSize), 'white')
    # Using Truetype FreeFont here
    font = ImageFont.truetype("FreeMonoBold.ttf", 12, encoding="unic")
    draw = ImageDraw.Draw(image)

    # Draw a filled rectangle - about OLED screen size
    draw.rectangle([(1,1), (frameSize[0]-2,frameSize[1]-2)], 'black', 'white')

    # Load the image clip files and X Y coordinates.
    # Images will be placed at these coordinates.
    # Using PNG files with alpha channel.
    filenames = [['square.png', 17, 18]
                , ['line.png', 5, 50]
                , ['circle.png', 30, 24]
                , ['triangle.png', 50, 18]]
    # Place each image on the canvas created above.
    for filename in filenames:
        imageClip = Image.open(filename[0])
        imageSize = imageClip.size
        cX = filename[1]
        cY = filename[2]
        # Using alpha channel for transparent clip background
        image.alpha_composite(imageClip, (cX, cY))
    # Add some text
    draw.text((5, 5), 'Hello World', fill='white', font=font)
    # Convert image to RGB mode for OLED display
    imageRGB = image.convert('RGB')
    '''
    # Output to OLED/LCD display
    device.display(imageRGB)
    '''
    # Output to PC image viewer
    imageRGB.show()

    # Show the frame for n seconds
    sleep(5)

if __name__ == "__main__":
    main()
To Conclude
This article reveals how you can create and test OLED/LCD display content on a PC or Laptop computer. Ultimately, this provides a higher convenience where you do not have the Raspberry Pi with a display at hand.
However, we have only solved the problem with static content. But suppose we want to create dynamic, interactive content.
In the next article of this series, I demonstrate how to write and test code for interactive content on a PC. Then, with a little editing, run the same content on the Raspberry Pi to output on an OLED display.
Related Articles

Nokia 5110 LCD Display Setup For Raspberry Pi Guide – Link.
Buying Featured Items
The purchase price is going to vary greatly depending on how quickly you want the items. Therefore shop around checking out Amazon, Ebay, Adafruit and local electronic stores.
DISCLAIMER: This feature may contain affiliate links, which means that if you click on one of the product links, I’ll receive a small commission. This commission helps support the website and allows me to continue to make features like this. Thank you for the support!
Banggood:
- Geekcreit® 0.95 Inch 7pin Full Color 65K Color SSD1331 SPI OLED Display – Link.
UK Searches:
UK Amazon:
- Raspberry Pi – Search.
- MicroSD Card – Search.
- Raspberry Pi Compatible Wi-Fi Dongle – Search.
- Raspberry Pi Camera – Search.
US Searches:
US Amazon:
- Raspberry Pi – Search.
- MicroSD Card – Search.
- Raspberry Pi Compatible Wi-Fi Dongle – Search.
- Raspberry Pi Camera – Search.
On Closing
I hope you find this article useful – Create OLED or LCD Display Content with Pillow – Graphics and Fonts, please like and share.
2 thoughts on “Create OLED or LCD Display Content with Pillow – Graphics and Fonts”
Comments are closed.