
Thanks to an impressive Python library, we can connect various types of OLED displays to the Raspberry Pi such as the SSD1331 colour display. So to get this vivid, high-contrast 16-bit colour display up and running, I take a look at how to set up this library from . Additionally, I also show how to install and run the many examples available.
In this feature, I go through the install process to the point where most of the demo examples can be run. Then in a separate article, I’ll take a look at how to use this library for personal projects. You will find related articles below when available.
The Luma.OLED library, as of writing, currently supports SSD1306, SSD1322, SSD1325, SSD1331, SSD1351 or SH1106 display drivers. The SSD1331 and the SSD1351 are the full-colour displays. If you are looking for a small display that is suitable for most light conditions, the OLED displays are an excellent option.
On the performance side of things, all the Raspberry Pi board versions will work to some degree. However, if you want to output colour video from the Raspberry Pi camera, a multicore Raspberry Pi is best suited. The many demo programs provided for this library will give you a good performance indication for the various Pi boards you want to try.
The Luma-OLED Python package is an excellent library that is well documented, plus you get to view all the code for the demo programs that cover many different content output methods.
SSD1331 OLED Colour Display Setup
This setup guide will work for all the displays the library supports with the SPI interface. However, you can refer to the library documentation for OLED displays with the I2C interface.
I will begin the install process by firstly setting up the hardware followed by the library setup. Then, I will cover the process to install the example library programs and also demonstrate how to run them.
Oled Display Hardware Setup
CONNECTING THE SPI DISPLAY
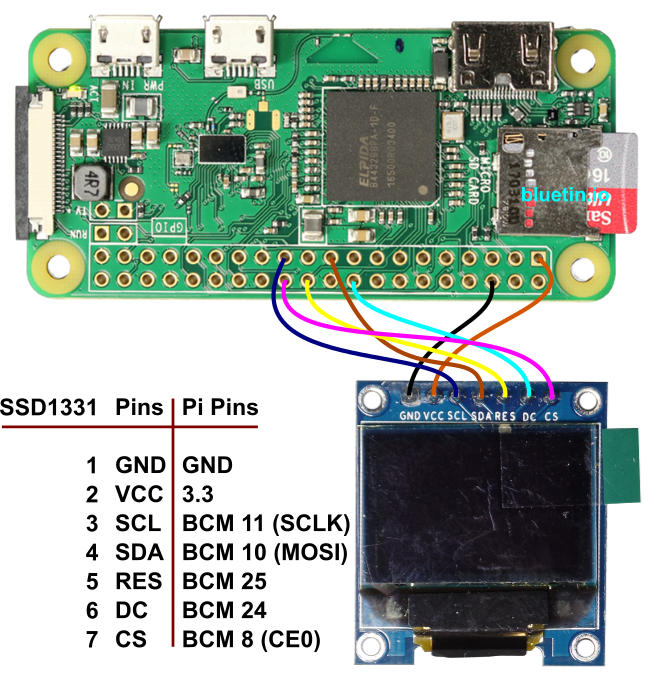
You usually get these OLED displays with header pins already in place. So you can use female to female jumper wires to connect the display to the Raspberry Pi directly. However, before connecting the display power down the Raspberry Pi first. Therefore, with the power off, you will get the chance to double check the wire connections thus avoiding accidental damage.
Note that we are using Broadcom (BCM) pin numbering here for the GPIO pins, as opposed to physical (BOARD) numbering.
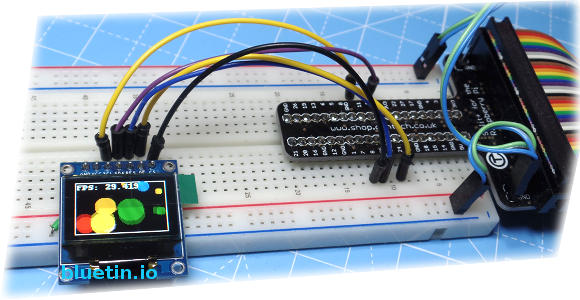
You can always connect the display using a T-cobbler, jumper wires and a breadboard. Furthermore, the T-Cobbler has the advantage of having pin names which help quickly identify each pin. Also, the breadboard will take other devices such as sensors where you can output readings to the small display.
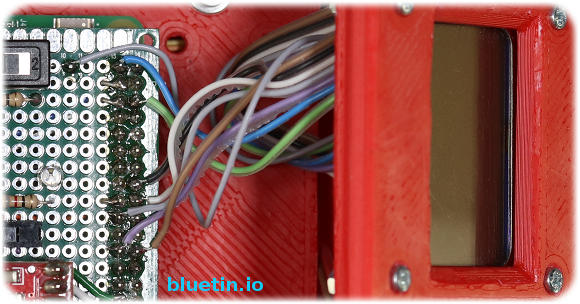
You can create your own Pi Hat using a 40 pin header and a small through-hole PCB. The image above shows a display soldered directly onto the 20×2 row header pins. This SPI display is the Nokia 5110 LCD Display; check related articles below for the guide.
ENABLE THE SPI INTERFACE FOR THE OLED
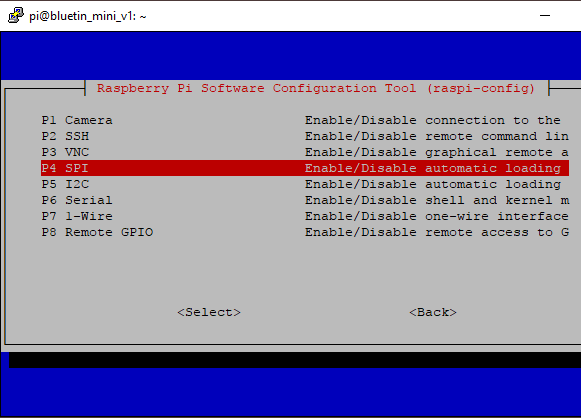
In case you are using the SPI interface for the first time, run the Raspberry Pi Configuration Tool to enable it. In the Raspberry Pi Terminal, enter the following command to run the configuration:
sudo raspi-config
Select Interfacing Options from the list, then SPI from the following list to enable the interface.
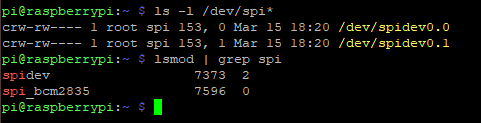
Execute either of the following commands to check that the SPI interface is available.
ls -l /dev/spi*
# or
lsmod | grep spi
And the output will be as follows respectively:
Add user to the SPI and GPIO groups.
sudo usermod -a -G spi,gpio pi
You can check which groups your user account belongs to by entering groups at the Terminal command prompt.
To refresh the user account, log out and then log back in.
OLED Display Library Setup
There is already an excellent install guide for this Python OLED display library in the accompanying documentation. However, for convenience, I’ll list the commands here specifically for Python 3. Then, it will be just a case of copying and pasting all the commands over to the Terminal. Using these commands will help avoid accidentally mixing Python versions during installation when manually adding the version number to Python.
If you are installing for other versions of Python, use the following installation guide in the link below if necessary.
- More detailed installation guide here.
Assuming you are using a desktop PC to open a Terminal to the Raspberry Pi, Copy and paste and execute the following commands line by line:
sudo apt-get install python3-dev python3-pip libfreetype6-dev
sudo apt-get install libjpeg-dev build-essential

sudo -H pip3 install --upgrade luma.oled
Example Code Setup
We now install the example code to the user home directory. The example programs will allow us to test that the display is working and also to test the display performance. Some of the example programs require further software dependances to run. So, we install further programs with the following line:
sudo apt install libsdl-dev libportmidi-dev libsdl-ttf2.0-dev
sudo apt install libsdl-mixer1.2-dev libsdl-image1.2-dev
The following command will get the example Python programs from the GitHub repository:
git clone https://github.com/rm-hull/luma.examples.git
cd luma.examples
Lastly, the following command will install the Luma libraries:
sudo -H pip3 install -e .
Running OLED Display Example Programs
With the Luma-OLED Display Python module setup complete, you will now be able to run most of the examples. However, you might have to install additional software dependencies to be able to run every example. You can view a full list of the example Python programs by pointing your internet browser to the GitHub repository:
- Luma-OLED Example code list here.
On the GitHub readme page, you will also see information about command line options. These command options are required so that the example programs can run correctly for a particular display.
So, for the SPI SSD1331 Colour Display, we run the following example Python program with required options:
Firstly, at the Terminal prompt, change directory to the example programs location:
cd luma.examples/examples
Then, run the following example program:
python3 bounce.py -d ssd1331 -i spi --width 96 --height 64
S0, the minimum command options we need to run an example program is:
- Display Type
- Interface
- Screen Size
And there you have it. Try the other examples with the same command line options.
Further OLED Display Articles
We want to do more with this OLED display than just run some example code. So, in the next feature, we are going to look at how to use the Luma OLED Python library. If you are already familiar with the Python Image Library, this will be an easy step forward to producing your own display content.
Related Articles
Simulate Animated OLED/LCD Display On PC With PIL and OpenCV – Link.
Create OLED or LCD Display Content with Pillow – Graphics and Fonts – Link.

Nokia 5110 LCD Display Setup For Raspberry Pi Guide – Link.
Buying Featured Items
DISCLAIMER: This feature may contain affiliate links, which means that if you click on one of the product links, I’ll receive a small commission. This commission helps support the website and allows me to continue to make features like this. Thank you for the support!
Banggood:
- Geekcreit® 0.95 Inch 7pin Full Color 65K Color SSD1331 SPI OLED Display – Link.
UK Searches:
UK Amazon:
- Raspberry Pi – Search.
- MicroSD Card – Search.
- Raspberry Pi Compatible Wi-Fi Dongle – Search.
- Raspberry Pi Camera – Search.
US Searches:
US Amazon:
- Raspberry Pi – Search.
- MicroSD Card – Search.
- Raspberry Pi Compatible Wi-Fi Dongle – Search.
- Raspberry Pi Camera – Search.
On Closing
I hope you find this article useful – OLED Display Library Setup for the Raspberry Pi featuring SSD1331, please like and share.
2 thoughts on “OLED Display Library Setup for the Raspberry Pi featuring SSD1331”
Comments are closed.