
The Nokia 5110 LCD Display seems a perfect fit for the Raspberry Pi as the screen can be connected directly. So here is a guide on how to set one up with details on how to hookup and install libraries. Also included is an example Python program in addition to the code examples included with the libraries.
In many cases, it is probably not necessary to fit a display to the Raspberry Pi powered robot vehicle. However, having an onboard display can widen experimentation. Thus you can view the feedback without taking your eyes off the robot during manoeuvres. And since I’m using a Raspberry Pi compatible game controller, there are spare buttons that can be used to operate a menu system within the display.
With my robot projects, I am not sure how I am going to use the Nokia 5110 LCD Display yet. So to begin with, I will be looking at getting some feedback from the game controller that controls the robot. I may also create a splash screen to show the robot name and software version on program startup. In any case, having a display available to work with will likely generate more exciting ideas.
Nokia 5110 Display Details
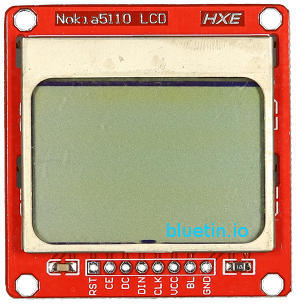
When you search for the Nokia 5110 display on ebay, you might notice slight differences in some breakout boards between sellers. So while the screen itself will be a consistent size, the breakout board is probably not. Furthermore, the pinout order may also be inconsistent between boards. So checking the labels when connecting to the Raspberry Pi is necessary when following hookup guides.

3D Printing
However, in case you do not have the screen yet, it should still be possible to design in this screen into a project using approximate measurements. Then make adjustments as necessary to fit the display into the design. Using a CAD, CAM tool like Fusion 360 should make this easy.
Specification
- Uses Serial SPI (Serial Peripheral Interface).
- Power supply voltage: 2.7V – 3.3V.
- Backlight power supply voltage: 3.3V maximum.
- 45.3mm x 46.7mm (width x height).
- 84 x 48 dot matrix LCD.
- Transfer rate up to 4Mbps.
- No display write lag.
- Working supply current can be less than 200μA.
Pinout Details
- RST – Reset.
- CE – Chip Select.
- DC – Mode Select.
- DIN – Serial Data In (MOSI).
- CLK – Serial Clock.
- VCC – Supply voltage range between 2.7V and 3.3V.
- BL – Backlight 3.3V Maximum.
- GND – Ground.
Display Wire connections

Using jumper wires to connect the Nokia 5110 to the Raspberry Pi should be fine for testing purposes. However, using jumper wires can be prone to accidental sabotage which can damage the Raspberry Pi. Therefore, for a project such as a robot vehicle, I recommend soldering wires directly between the boards. In the case of the Raspberry Pi, you can solder the wires directly to a prototyping Hat.
Backlight
In my circuit, I opted to connect a slide switch and an 80 Ohm resistor to the backlight. The backlight resistor is in addition to the resistors already installed on my particular module.
Note that some LCD modules could have different backlight wiring and powering requirements. You will need to investigate how to use the backlight on a per LCD module bases. There are no guarantees that each Nokia LCD module will have the same backlight wiring and powering requirements.
Nokia 5110 Python Library Installation
For a complete installation guide visit the Adafruit Learn pages, and also check out some of the great products there. Take a look at the Nokia 5110 guide at the following link.
Adafruit Learn – Nokia 5110/3310 LCD Python Library – Link.
However, here is a quick reminder of the installation steps for those who have installed the libraries before:
Raspberry Pi and Python Setup Summary
Enable SPI using the Raspberry Pi configuration tool. When in the configuration tool menu, navigate to the Interface Options and ‘select’ to find the SPI enable option.
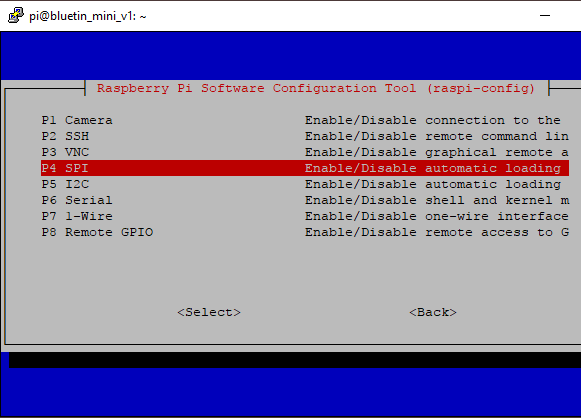
Execute the following command to open the Raspberry Pi configuration tool at the Terminal command prompt:
sudo raspi-config
Then, after enabling SPI, leave the Raspberry Pi configuration and return to the Terminal command prompt.
Enter the following commands:
sudo apt-get install python-pip python-dev build-essential
sudo pip install RPi.GPIO
sudo apt-get install python-imaging
sudo apt-get install git
git clone https://github.com/adafruit/Adafruit_Nokia_LCD.git
cd Adafruit_Nokia_LCD
sudo python setup.py install
Nokia 5110 Example Python Code
With the Nokia 5110 display wired up correctly to the Raspberry Pi, the example Python code can now be used to test the Nokia display. You can find example code in the Adafruit library download files. The Python code will illustrate the minimum lines of code you will need to operate the screen.
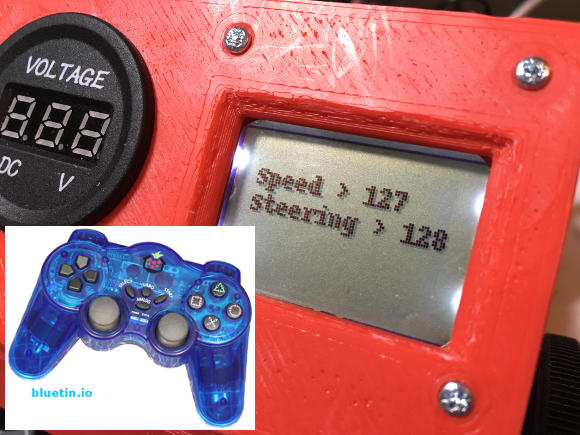
However, I include my example code that will show the display continually updating from the game controller feedback. The Python code for the game controller is from this article; then Python code is added to operate the Nokia display.
You can also get the Python code from GitHub here.
#!/usr/bin/env python3
"""
robot_nokia_lcd_demo.py
www.bluetin.io
"""

__author__ = "Mark Heywood"
__version__ = "0.1.0"
__license__ = "MIT"

from inputs import get_gamepad
from time import sleep

import Adafruit_Nokia_LCD as LCD
import Adafruit_GPIO.SPI as SPI

# Python Imaging Library (PIL)
from PIL import Image
from PIL import ImageDraw
from PIL import ImageFont

# Raspberry Pi hardware SPI config:
DC = 23
RST = 24
SPI_PORT = 0
SPI_DEVICE = 0

# Hardware SPI usage:
disp = LCD.PCD8544(DC, RST, spi=SPI.SpiDev(SPI_PORT, SPI_DEVICE, max_speed_hz=4000000))

# Dictionary of game controller buttons we want to include.
controller_input = {'ABS_X': 0, 'ABS_RZ': 0, 'BTN_SOUTH': 0, 'BTN_WEST': 0}

#-----------------------------------------------------------

def gamepad_update():
    # Code execution stops at the following line until gamepad event occurs.
    events = get_gamepad()
    return_code = 'No Match'
    for event in events:
        event_test = controller_input.get(event.code, 'No Match')
        if event_test != 'No Match':
            controller_input[event.code] = event.state
            return_code = event.code
        else:
            return_code = 'No Match'

    return return_code

#-----------------------------------------------------------

def drive_control():
    # Function to drive robot motors
    print('Drive and Speed --> {} || Steering Angle --> {}' .format(controller_input['ABS_RZ'], controller_input['ABS_X']) )

    # Create blank image for drawing.
    # Make sure to create image with mode '1' for 1-bit color.
    image = Image.new('1', (LCD.LCDWIDTH, LCD.LCDHEIGHT))

    # Get drawing object to draw on image.
    draw = ImageDraw.Draw(image)
    # Draw a white filled box to clear the image.
    draw.rectangle((0,0,LCD.LCDWIDTH,LCD.LCDHEIGHT), outline=255, fill=255)

    # Load default font.
    font = ImageFont.load_default()

    # Write some text.
    draw.text((1,5), 'Speed > {}' .format(controller_input['ABS_RZ']), font=font)
    draw.text((1,15), 'Steering > {}' .format(controller_input['ABS_X']), font=font)

    # Display image.
    disp.image(image)
    disp.display()

#-----------------------------------------------------------

def fire_nerf_dart():
    # Function to fire Nerf dart gun on the robot
    print('Fire Nerf Dart --> {}' .format(controller_input['BTN_SOUTH']) )

#-----------------------------------------------------------

def led_beacon():
    # Function to switch led beacon on/off on the robot
    print('Switch LED Beacon --> {}' .format(controller_input['BTN_WEST']) )

#-----------------------------------------------------------

def splash_screen():
    # Show splash screen at start of program and delay for five seconds.

    # Alternatively load a different format image, resize it, and convert to 1 bit color.
    image = Image.open('bluetin-mini-lcd-title.png').resize((LCD.LCDWIDTH, LCD.LCDHEIGHT), Image.ANTIALIAS).convert('1')

    # Display image.
    disp.image(image)
    disp.display()

    sleep(5)

#-----------------------------------------------------------

def main():
    """ Main entry point of the app """

    # Initialize library.
    disp.begin(contrast=60)

    # Clear display.
    disp.clear()
    disp.display()

    # Show splash screen. The screen will update after controller input.
    splash_screen()

    while 1:
        # Get next controller Input
        control_code = gamepad_update()

        # Gamepad button filter
        if control_code == 'ABS_X' or control_code == 'ABS_RZ':
            # Drive and steering
            drive_control()
        elif control_code == 'BTN_SOUTH':
            # Fire Nerf dart button
            fire_nerf_dart()
        elif control_code == 'BTN_WEST':
            # Switch the LED Beacon
            led_beacon()

#-----------------------------------------------------------

if __name__ == "__main__":
    """ This is executed when run from the command line """
    main()
Related Articles
OLED Display Library Setup for the Raspberry Pi featuring SSD1331 – Link.
Create OLED or LCD Display Content with Pillow – Graphics and Fonts – Link.
Buying Featured Items
The purchase price is going to vary greatly depending on how quickly you want the items. Therefore shop around checking out Amazon, Ebay, Adafruit and local electronic stores.
Adafruit:
- Nokia 5110/3310 monochrome LCD + extras – Link.
UK Searches:
UK Amazon:
US Searches:
US Amazon:
On Closing
I hope you find this article useful – Nokia 5110 Display Setup For Raspberry Pi Guide, please like and share.