
In this feature, I look at what it takes to setup object detection and tracking using OpenCV and Python code. Using the code snippets included, you can easily setup a Raspberry Pi and webcam to make a portable image sensor for object detection.
This article is ideal for anybody looking to use OpenCV in Raspberry Pi projects. Some projects can include Raspberry Pi robot vehicles for obstacle avoidance or waypoint tracking. Also, object counting and monitoring included.
Object Detection
Object detection builds on my last article where I apply a colour range to allow an area of interest to show through a mask. In this feature, I continue to use colour to use as a method to classify an object. If I can classify an object by colour, I can track the object from video frame to video frame. For this to work, it is essential for the object to be a different colour to the surrounding area. However, smaller objects of a similar colour can be filtered out using OpenCV methods.
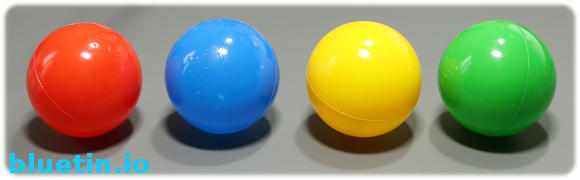
For a Pi Wars challenge, my robot needs to be able to detect and track round plastic balls of different colours. Therefore, I will be using an example of these round balls to test the code below.
I am going to use colour to classify these plastic balls, but note that this is not the only method to classify an object. Since the plastic balls are a good solid even colour, Object detection by colour is the best choice in this case.
Object Detection with Python
All the code snippets below are included in the example OpenCV example program near the end of this article.
Object Classification
Colour Threshold
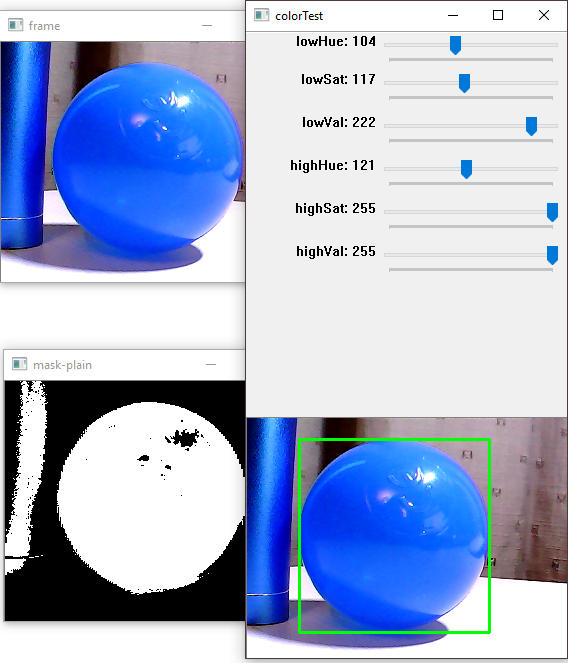
I opted to detect the plastic ball by colour so I need to set the colour range that I can use to classify each coloured ball.
blue = (104, 117, 222, 121, 255, 255)
I use an array to hold the values of the lower and upper colour threshold. The colour threshold uses the HSV (Hue Saturation Value) colour profile.
Colour Conversion
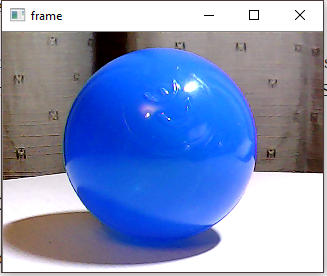
frameHSV = cv2.cvtColor(frame, cv2.COLOR_BGR2HSV)
Before I can use the HSV profile values that define the coloured ball, I must convert the captured webcam frame to the HSV colour profile.
Create a Mask
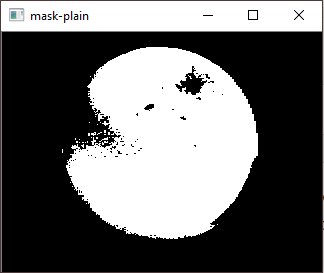
colorLow = np.array([lowHue,lowSat,lowVal])
colorHigh = np.array([highHue,highSat,highVal])
mask = cv2.inRange(frameHSV, colorLow, colorHigh)
Here I use the colour range I set for the ball to create a mask. The mask will make it more efficient to find contours around the detected object. The white area is the area of interest that was found within the colour range set above. I can use various image filters to improve the image mask. However, applying filters to get the perfect mask can be expensive in regards to processing power.
OpenCV Contours
Find Contours
im2, contours, hierarchy = cv2.findContours(mask, cv2.RETR_TREE, cv2.CHAIN_APPROX_SIMPLE)
Now that I have an image mask to work with I can proceed with finding contours. The third parameter, contour approximation method, will collect only the endpoint coordinates of straight lines. All the white blobs in the mask will have contours applied. The array list of found contours will be in the contours variable.
(Optional) Draw all Contours
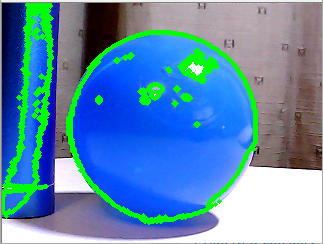
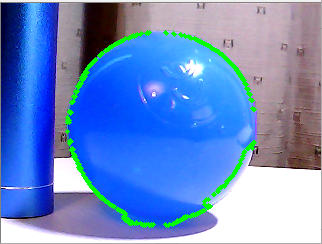
cv2.drawContours(frame, contours, -1, (0,255,0), 3)
Two objects are detected, and some of the darker blue colour is out of range of the threshold set earlier. If the quality of the mask is noisy, there is going to be a lot of contours – many small contours. To get useful object detection, I need to remove the contours I do not need.
The image above shows a contour circling the plastic ball; I will aim to isolate that in the next step.
(Optional) Finding The Largest Contour
contour_sizes = [(cv2.contourArea(contour), contour) for contour in contours]
biggest_contour = max(contour_sizes, key=lambda x: x[0])[1]
cv2.drawContours(frame, biggest_contour, -1, (0,255,0), 3)
The above OpenCV Python code finds the biggest contour out of all the contours found. And then draw the biggest contour on to the original image. Since the ball is the largest blue object, I can reliably detect the ball. However, the ball must remain the dominant blue object and remain in focus to be tracked reliably.
So at this point, I was able to improve OpenCV object detection. I am now only detecting one item. The quality of the object detection is very good in this case. However, moving webcam or object or even changing light conditions can make the quality of detection unpredictable.
Bounding Rectangle
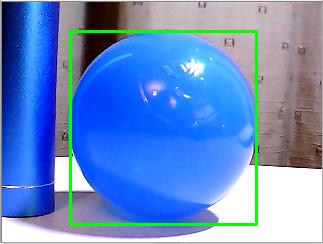
contour_sizes = [(cv2.contourArea(contour), contour) for contour in contours]
biggest_contour = max(contour_sizes, key=lambda x: x[0])[1]
x,y,w,h = cv2.boundingRect(biggest_contour)
cv2.rectangle(frame,(x,y),(x+w,y+h),(0,255,0),2)
As you can see from the example image, with very little Python code, I got good OpenCV object detection. The third line of the above Python code reveals how I can pull useful data about the detected object. Furthermore, I can see how this data is being used to draw a bounding box around the detected object.
If I am using OpenCV in an embedded device like the Raspberry Pi, I will only use the first three lines of the above code. And the above code should follow the find contours method.
The x, y coordinates and the width, height dimensions will constantly change between webcam frame updates. Also, the coordinates and dimensions will change more dramatically with larger objects where environmental conditions are variable.
Resources
- OpenCV – Contours – Getting Started – Link.
- OpenCV – Contour Features – Link.
- Python 3+ for Windows download – Link.
- Wrapper package for OpenCV Python bindings (used for Windows platform) – Link.
- Using the Raspberry Pi Camera with OpenCV – Link.
Related Articles

Install OpenCV onto Raspberry Pi from Shell Script – Link.

OpenCV Color Detection and Filtering with Python – Link.
Pi Camera Video Capture with OpenCV and Python Multithreading – Link.
Object Detection Python Test Code
Refer to the previous article here if help is needed to run the following OpenCV Python test code.
Also find the code on GitHub here.
#!/usr/bin/env python3 """ File: opencv-webcam-object-detection.py This Python 3 code is published in relation to the article below:OpenCV Color Detection and Filtering with PythonWebsite: www.bluetin.io Author: Mark Heywood Date: 31/12/2017 Version 0.1.0 License: MIT """ from __future__ import division import cv2 import numpy as np import time def nothing(*arg): pass FRAME_WIDTH = 320 FRAME_HEIGHT = 240 # Initial HSV GUI slider values to load on program start. #icol = (36, 202, 59, 71, 255, 255) # Green #icol = (18, 0, 196, 36, 255, 255) # Yellow #icol = (89, 0, 0, 125, 255, 255) # Blue #icol = (0, 100, 80, 10, 255, 255) # Red #icol = (104, 117, 222, 121, 255, 255) # test icol = (0, 0, 0, 255, 255, 255) # New start cv2.namedWindow('colorTest') # Lower range colour sliders. cv2.createTrackbar('lowHue', 'colorTest', icol[0], 255, nothing) cv2.createTrackbar('lowSat', 'colorTest', icol[1], 255, nothing) cv2.createTrackbar('lowVal', 'colorTest', icol[2], 255, nothing) # Higher range colour sliders. cv2.createTrackbar('highHue', 'colorTest', icol[3], 255, nothing) cv2.createTrackbar('highSat', 'colorTest', icol[4], 255, nothing) cv2.createTrackbar('highVal', 'colorTest', icol[5], 255, nothing) # Initialize webcam. Webcam 0 or webcam 1 or ... vidCapture = cv2.VideoCapture(0) vidCapture.set(cv2.CAP_PROP_FRAME_WIDTH,FRAME_WIDTH) vidCapture.set(cv2.CAP_PROP_FRAME_HEIGHT,FRAME_HEIGHT) while True: timeCheck = time.time() # Get HSV values from the GUI sliders. lowHue = cv2.getTrackbarPos('lowHue', 'colorTest') lowSat = cv2.getTrackbarPos('lowSat', 'colorTest') lowVal = cv2.getTrackbarPos('lowVal', 'colorTest') highHue = cv2.getTrackbarPos('highHue', 'colorTest') highSat = cv2.getTrackbarPos('highSat', 'colorTest') highVal = cv2.getTrackbarPos('highVal', 'colorTest') # Get webcam frame _, frame = vidCapture.read() # Show the original image. cv2.imshow('frame', frame) # Convert the frame to HSV colour model. frameHSV = cv2.cvtColor(frame, cv2.COLOR_BGR2HSV) # HSV values to define a colour range we want to create a mask from. colorLow = np.array([lowHue,lowSat,lowVal]) colorHigh = np.array([highHue,highSat,highVal]) mask = cv2.inRange(frameHSV, colorLow, colorHigh) # Show the first mask cv2.imshow('mask-plain', mask) im2, contours, hierarchy = cv2.findContours(mask, cv2.RETR_TREE, cv2.CHAIN_APPROX_SIMPLE) contour_sizes = [(cv2.contourArea(contour), contour) for contour in contours] biggest_contour = max(contour_sizes, key=lambda x: x[0])[1] #cv2.drawContours(frame, biggest_contour, -1, (0,255,0), 3) x,y,w,h = cv2.boundingRect(biggest_contour) cv2.rectangle(frame,(x,y),(x+w,y+h),(0,255,0),2) #cv2.drawContours(frame, contours, -1, (0,255,0), 3) #cv2.drawContours(frame, contours, 3, (0,255,0), 3) #cnt = contours[1] #cv2.drawContours(frame, [cnt], 0, (0,255,0), 3) # Show final output image cv2.imshow('colorTest', frame) k = cv2.waitKey(5) & 0xFF if k == 27: break print('fps - ', 1/(time.time() - timeCheck)) cv2.destroyAllWindows() vidCapture.release()
Buying Featured Items
The purchase price is going to vary greatly depending on how quickly you want the items. Therefore shop around checking out Amazon, Ebay, Adafruit and local electronic stores.
Banggood:
- No Driver required Mini USB Camera For Raspberry Pi – Link.
UK Searches:
UK Amazon:
US Searches:
US Amazon:
On Closing
I hope you find this article useful – Object Detection and Tracking with OpenCV and Python, please like and share.
One thought on “Object Detection and Tracking with OpenCV and Python”
Comments are closed.