
In this article, I install the Raspberry Pi Camera which I will be using to add camera vision to a robot. Also, to maximise the performance of OpenCV and Camera, I will be using a utility to add multithreading to the Python applications. Furthermore, I include Python demo code which also supports USB webcams.
This feature will provide a quick reminder on how to connect the Pi Camera to the Raspberry Pi. Also, you get a quick run-through on the software setup. I assume that OpenCV and supporting libraries are already installed; which will be needed to run the sample code included below.
The article below will provide an easy path to install OpenCV if you need to take this step:

Install OpenCV onto Raspberry Pi from Shell Script – Link.
Installing the Raspberry Pi Camera
CONNECTING THE CAMERA
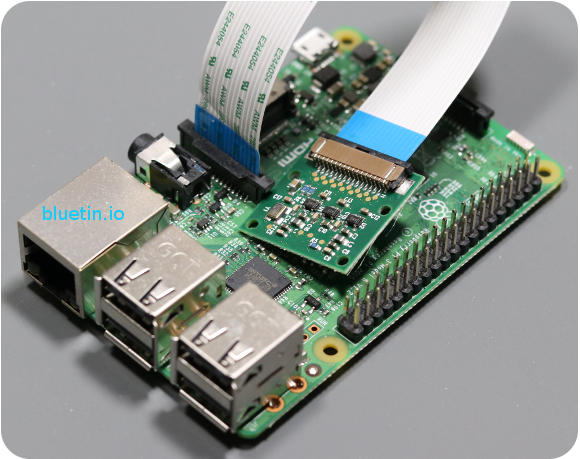
Here we connect the Pi Camera to the Raspberry Pi. The ribbon cable has to be connected the correct way round. So, the best way to connect the camera is to use the above image as a reference. And you will notice the blue insulation on the ribbon cable is facing our direction. This blue insulation is generally facing the movable part of the ribbon connector.
Ideally, the camera is best in a fixed position with the Pi mainboard to avoid having the ribbon cable work lose.
SETTING UP THE SOFTWARE
After connecting the Camera to the Raspberry Pi board, we will enable the camera through the Raspberry Pi configuration tool. Therefore, SSH into the Pi using a Terminal program and enter the following command at the prompt:
sudo raspi-config
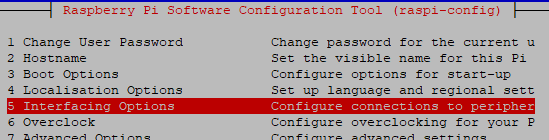
Then, when the configuration tool opens, select interfacing options.

Find the Raspberry Pi Camera and enable it, then return to the Terminal.
Enter the following command to test the camera by taking a picture:
raspistill -o output.jpg
You can view the snapped image on the Pi desktop if you have access to it. Or, if no Pi desktop available, download the pic via FTP to view on the PC.
INSTALLING PYTHON MODULES
To access the Raspberry Pi Camera through Python, we need to install modules. The following command will install the main camera module along with a sub-module that will give Numpy Array support:
Note that you might want to use Python Virtual Environment if you have that setup. Furthermore, I use Python 3 in the command below; using a different Python version might need a different installer version.
pip3 install "picamera[array]"
Pi Camera Video Capture Multithreading
My interest in OpenCV is currently driven by building programmable robots with camera vision. These robots will have to perform several tasks concurrently to function efficiently. Below are some tasks that you might expect a programmable robot to perform:
- For radio control, the robot will have to periodically check for incoming radio control data, and process them.
- Read proximity sensors for object avoidance or tracking.
- Update onboard display with live updates.
- Update DC motor drivers.
- Scan GPIO connected switches.
- Get next camera image for processing.
The range of robot tasks is not limited to the above, but already there are at least three that can slow down the main thread of the robot program. I/O devices such as wireless gamepad, onboard camera and display can slow or even block code execution. So, to keep the main thread of our main program running smoothly, we can run the Pi Camera in a separate Python thread.
Install Imutils Python Package
In a recent article, I put the wireless gamepad into a separate program thread to get around its code execution blocking feature. This time, I put the Pi Camera I/O function into a separate thread for the same reason. However, the work of creating a multithreading program for the Pi Camera is already done for us. All we need to do is install a Python package that is being maintained by Adrian Rosebrock from Py Image Search – Link.
Run the following command in the Raspberry Pi Terminal to install the Python package:
Note that to use this Python library, you will have to install NumPy and OpenCV libraries beforehand. Additionally, to use some features of this library, you may have to install matplotlib.
pip3 install imutils
Pi Camera Example Python Code
Here, I show the minimum of what you will require for a multithreading OpenCV application. Additionally, due to the features of the imutils Python library, we can easily swap between the Pi Camera and USB Webcam.
# File: threaded_videostream_demo.py

import time

import cv2
import numpy as np
from imutils.video import VideoStream
import imutils

# Are we using the Pi Camera?
usingPiCamera = True
# Set initial frame size.
frameSize = (320, 240)

# Initialize mutithreading the video stream.
vs = VideoStream(src=0, usePiCamera=usingPiCamera, resolution=frameSize,
		framerate=32).start()
# Allow the camera to warm up.
time.sleep(2.0)

timeCheck = time.time()
while True:
	# Get the next frame.
	frame = vs.read()

	# If using a webcam instead of the Pi Camera,
	# we take the extra step to change frame size.
	if not usingPiCamera:
		frame = imutils.resize(frame, width=frameSize[0])

	# Show video stream
	cv2.imshow('orig', frame)
	key = cv2.waitKey(1) & 0xFF

	# if the `q` key was pressed, break from the loop.
	if key == ord("q"):
		break

	print(1/(time.time() - timeCheck))
	timeCheck = time.time()

# Cleanup before exit.
cv2.destroyAllWindows()
vs.stop()
The imutils library takes care of implementing the camera multithreading functions. Furthermore, the library also takes care of different camera type handling. So, all we need to do is, initialise the video stream with the camera and frame size we want to use. To choose whether to use the Raspberry Pi Camera or a compatible webcam just update the variable as below in the code:
# Are we using the Pi Camera?
usingPiCamera = True
# Set initial frame size.
frameSize = (320, 240)
The above demo code runs under Windows and Raspberry Pi using compatible cameras.
Windows 10
If you are interested in running OpenCV on Windows 10, you will need to install Python. Then, using the Python pip package manager, install Numpy and OpenCV libraries. I believe Python includes the pip package manager with Windows Python installation.
- Download and install the latest Python 3 software for Windows.
- Then install the packages below in the Windows command prompt:
pip3 install numpy
pip3 install opencv-python
pip3 install imutils
The Idle application should now be available to run and edit Python code in Windows. Additionally, adjust the demo code above to work with USB webcam.
# Are we using the Pi Camera?
usingPiCamera = False
Related Articles

Multithreading Raspberry Pi Game Controller in Python – Link.
![]()
Object Detection and Tracking with OpenCV and Python – Link.
Buying Featured Items
The purchase price is going to vary greatly depending on how quickly you want the items. Therefore shop around checking out Amazon, Ebay, Adafruit and local electronic stores.
The Pi Hut
- Raspberry Pi Compatible Wireless Gamepad / Controller – Link
UK Searches:
UK Amazon:
- Raspberry Pi – Search.
- MicroSD Card – Search.
- Raspberry Pi Compatible Wi-Fi Dongle – Search.
- Raspberry Pi Camera – Search.
US Searches:
US Amazon:
- Raspberry Pi – Search.
- MicroSD Card – Search.
- Raspberry Pi Compatible Wi-Fi Dongle – Search.
- Raspberry Pi Camera – Search.
On Closing
I hope you find this article useful – Pi Camera Video Capture with OpenCV and Python Multithreading, please like and share.
One thought on “Pi Camera Video Capture with OpenCV and Python Multithreading”
Comments are closed.