

In preparation for a future project, I’m taking a close look at the Micro Servo 9g I bought from Ebay some time ago. So, to build the servo motor into a project, I require electrical specifications, wiring diagram, drawings with dimensions, 3D CAD model, and also test code for Arduino and Raspberry Pi.
I bought a batch of ten micro servos from Ebay just to have them available in my electronics toolbox. And as of writing, ten micro servos will cost around 13 pounds (GBP) or 16 dollars. Some of the uses these servos are good for include the following; which can be considered light duty:
- These servos are commonly found in mini camera pan and tilt mounts.
- Distance sensor rotation, ultrasonic and infrared.
- Animatronics – for example, robot facial expression manipulation and eye movements.
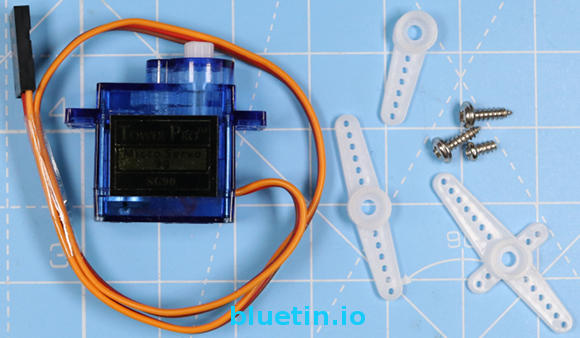
Counterfeit Servos
After doing some research about the servos I purchased, it looks like these servos, that are branded TowerPro may be counterfeit. You can visit the TowerPro website to compare micro servos from other sellers. One of the differences is that a genuine servo has the TowerPro Brand embossed on top of the casing.
Micro Servo Specifications
- Item Name: TowerPro SG90 Micro Analog Servo
- Size : 23*12.5*29.3mm
- Weight: 9g
- Case Type: Plastic
- Gear Type: Plastic
- Interface Type: Compatible with JR & Futaba interface
- Storage Temperature: -30°c- 60°c
- Operating Voltage: 3.5-6V
- Stall Torque: 1.2kg / 42.3oz (4.8V); 1.6 kg / 56.4oz (6.0V).
- Operating Speed: (4.8V no load): 0.12sec/60 degrees
- Rotary Angle: 180°
- Servo Cable Length: 250mm
Servo Interface Lead

For a single servo, the wires can be connected directly to the Arduino or Raspberry Pi. However, when connecting more than one servo to the controllers, you may need to create a separate 5 Volt power source to supply the servos with enough current.
Drawings with Dimensions
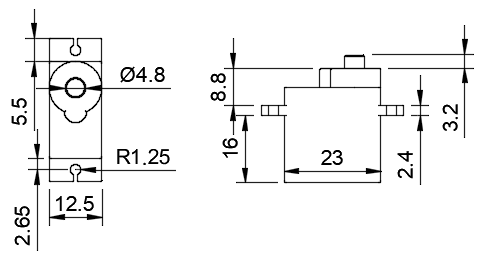
I don’t declare that the dimensions above are spot-on. But I’m confident that they will produce a close enough 3D model. If there are any slight differences between different suppliers, you can adjust the 3D model to fit when you eventually acquire the micro servo.
Servo Motor3d Models
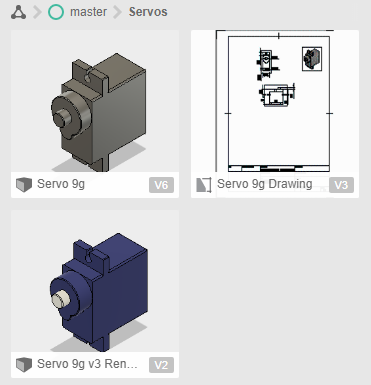
The servo motor is definitely a part worth saving as a 3D asset that you can use over and over again. Fusion 360 is the CAD software I am using today; which I use to build models for 3D printing. However, you do not have to own a CNC type of machine to use this software; you can visualise your project using any material type that has a dimension.
Micro Servo Test Code
Arduino
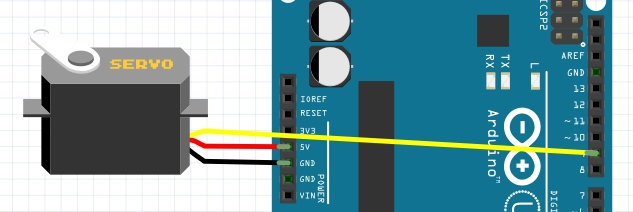
Code to test a connected servo is already available through the Arduino IDE. Select the sketch called Sweep from the menu File>Examples>Servo. Next, upload the code to the Arduino board. For the wiring, connect the servo yellow/orange signal wire to pin 9, then connect the red wire to 5 Volt, then black wire to ground on the Arduino.
Raspberry Pi Test Python Code
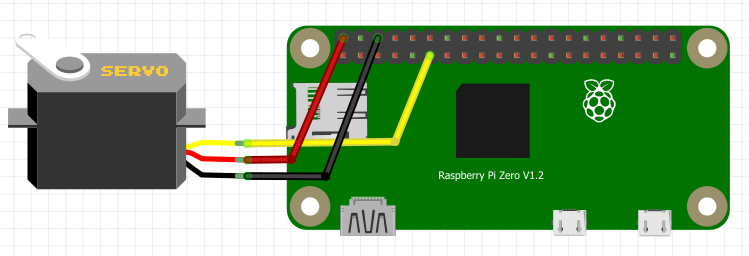
The micro servo 9g was tested on the Raspberry Pi Zero W with the Servo signal wire connected to GPIO17 (Pin 11). The red and black/brown wire of the servo was connected to 5v and ground on the Raspberry Pi.
#!/usr/bin/env python3

"""
servo_test.py
www.bluetin.io
16/01/2018
"""

__author__ = "Mark Heywood"
__version__ = "0.01"
__license__ = "MIT"

from gpiozero import Servo
from time import sleep

# Adjust the pulse values to set rotation range
min_pulse = 0.000544	# Library default = 1/1000
max_pulse = 0.0024		# Library default = 2/1000
# Initial servo position
pos = 0
test = 0

servo = Servo(17, pos, min_pulse, max_pulse, 20/1000, None)

while True:
	# For statement example
	for pos in range(0, 20):
		pos = pos * 0.1 - 1
		servo.value = pos
		print(pos)
		sleep(0.05)

	for pos in range(20, -1, -1):
		pos = pos * 0.1 - 1
		servo.value = pos
		print(pos)
		sleep(0.05)

	# While statement example
	"""
	while test < 20:
		pos = test * 0.1 - 1
		servo.value = pos
		print(pos)
		test = test + 1
		sleep(0.05)

	while test > 0:
		pos = test * 0.1 - 1
		servo.value = pos
		print(pos)
		test = test - 1
		sleep(0.05)
	"""
Save the above code to the Raspberry Pi and execute using something like the following in the Terminal:
python3 servo_test.py
The above Python code works similar to the Arduino servo sweep sketch. Furthermore, I’ve included two different loop constructs that can be tested separately.
I believe the pulses, driving the servo from the Raspberry Pi, is software driven. The behaviour of the servo during control is much less smooth than when controlled by the Arduino. So, driving a servo directly from the Raspberry Pi might not work if requiring precision and steady control.
References
- Tower Pro Official website – Link.
- TowerPro Micro Servo 9g – Link.
- Circuit connection diagrams in this feature made with Fritzing App – Link.
Related Articles
360 Degree Mod for Servo Continuous Rotation – Guide – Link.
Raspberry Pi Headless Install Without A Display Guide – Link.
Buying Featured Items
The purchase price is going to vary greatly depending on how quickly you want the items. Therefore shop around checking out Amazon, Ebay, Adafruit and local electronic stores.
UK Searches:
UK Amazon:
- Micro Servo – Search
- Arduino – Search
- Raspberry Pi – Search
- MicroSD Card – Search
- Raspberry Pi Compatible Wi-Fi Dongle – Search
US Searches:
US Amazon:
- Micro Servo – Search
- Arduino – Search
- Raspberry Pi – Search
- MicroSD Card – Search
- Raspberry Pi Compatible Wi-Fi Dongle – Search
On Closing
I hope you find this article useful – Micro Servo 9g – Raspberry Pi Servo Motor Python Code Test, please like and share.
One thought on “Micro Servo 9g – Raspberry Pi Servo Motor Python Code Test”
Comments are closed.