
In this post, I will be creating a two-cell 18650 Li-ion battery pack to power my robot projects. I show a step by step build process following a brief description of the items I use. If you own a balance charger already, you may also want to use the battery pack box to balance charge pairs of cells for other use.
The goal here is to build a two-cell battery pack to put into a robot vehicle. The battery pack will be made up of two Li-ion 18650 cells. To avoid soldering charging leads and balance cables directly on to the batteries, I’ll be using a battery box for the wire connections instead. Some of the benefits of using a battery box include:
- You can refresh the battery pack with new 18650 cells without resoldering wires.
- Avoid the risk of damaging the Li-ion cells when soldering wires directly to the battery pads.
- No need to spoil new batteries with blobs of solder.
- Able to reuse the individual cells while the battery box is not in use.
- Use the battery box to balance charge pairs of 18650 cells for other uses.
Battery Pack Parts
Before I get to the details of building the battery pack, we’ll take a closer look at the components I use.
Batteries for Battery Pack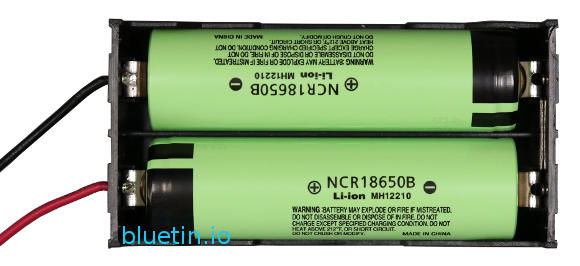
If looking to salvage old Li-ion 18650 battery packs from equipment such as laptop computers, these batteries are likely to be unprotected and of flat top type. Therefore, the battery pack I’m building in this feature will use these 18650 battery types. Using battery packs or individual 18650s from brands you trust are likely to deliver close to the specifications you are expecting. Maximising the quality of the battery pack will maximise the uptime of the robot between charging.
You will have to be aware that the 18650 Li-ion batteries can come in different lengths. The cells we are working with are 65mm long, and these fit comfortably in the battery box in this guide. Therefore, using taller batteries may lead to fitting problems.
Rewrapped protected and button top batteries are going to be physically too long for the battery box we are using. Additionally, rewrapped 18650s are likely to be the cheaper brands with exaggerated capacity claims. Therefore, it is best to purchase 18650 Li-ion batteries from sources and makes you trust.
Battery Pack Box
When using flat top Li-ion 18650s, it is important to choose the best battery box design. Choosing the wrong box will likely damage the cell coverings on the box pads and springs when inserting and removing cells. So, the box I’m using here has springloaded flat round contacts that will not snag and damage the 18650 wrapping.
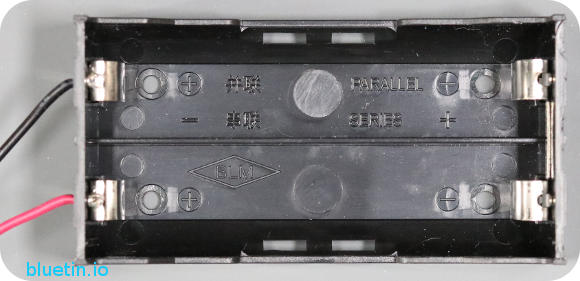
The battery holders are available in different configurations, and the one I’m interested in is the two cell ‘in series’ type without PCB pins. If you order one of these boxes, you may get what they call a universal battery holder. So, in this case, you will have to wire the box to either parallel or serial and remove the PCB pins. Ordering the 18650 holders from Banggood is likely to get you the exact configuration you want. I link to the box in the ‘Buying Featured Items’ section below.
Battery Pack Connectors
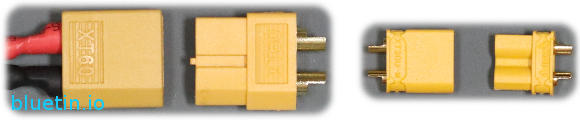
My Turnigy balance charger supports XT60 bullet connector plugs out of the box. But for my robot projects and the wire gauges I use, this bullet connector is a bit too big. Therefore, I’ll be using the XT30, which is a much smaller connector. And like other RC battery Connector types, the male and female plugs only fit one way, thus avoiding wrong polarity connection error.
I will use the XT30 connector on the battery pack for charging the 18650 cells. Additionally, I will use the same connector to power a robot project.
CONNECTOR CONVERTER
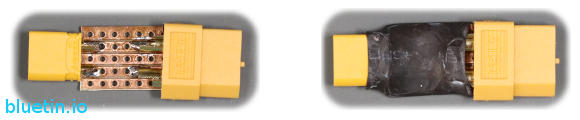
There is no need to lock yourself into any RC battery connector type because there are converters available. Also, you can make connector converter using additional connectors.
CHARGING BALANCE LEADS

To avoid overcharging individual 18650 cells, I’ll also be adding balance charging leads on the battery pack. You will usually see balance charging cables on LiPo battery packs when they have more than one cell in series. Furthermore, the leads allow you to check voltage levels of each cell.
I will be charging the cells in the battery holder, and since I’m using the Li-ion batteries in series (7.4 Volts), I’m going to include a balance charging cable. The connector on the balance cable is JST-XH, and you usually get 15cm of wire on the male plug. You also get the JST-XH female plug which is standard through-hole PCB friendly; handy if you want to connect the balance leads to PCB.
You will have to check which connector type your balance charger will accept.
Building Battery Pack
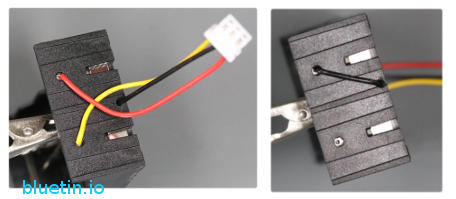
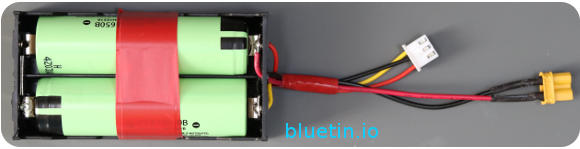
The balance charging cable shall be at least 15cm long to have enough length to feed through the battery box. I drill 2mm holes at each end of the 18650 box so that I can feed a wire through to the other end. The middle wire of the balance cable connects between the two Li-ion cells in series. As in the picture above, the black wire feeds through the battery box and then soldered to the far-side terminal.
The remaining two wires are then cut to length before soldering them to the remaining terminals. The red wire on my balance cable is correct for the positive side while the yellow is correct for negative. It is essential to connect the balance charging cable to the requirements of the balance charger.
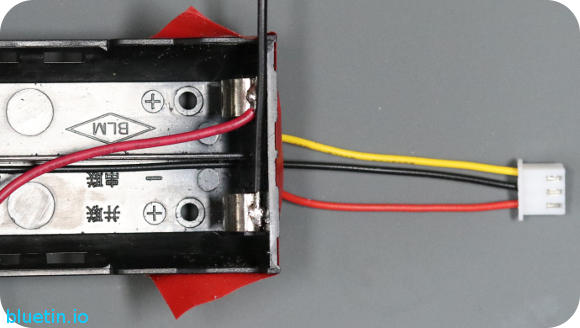
Next, I drill a further two holes to allow the heavier charging wires to be threaded through and out of the box. If the connector is on the charging cables already, I will feed the charging cables through the holes before soldering them to the terminals. However, before attempting to solder the charging wires, I use sticky tape to hold the balance charging cable that may become lose while soldering.
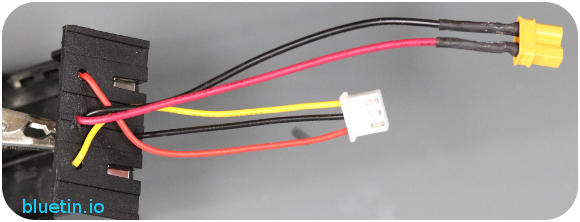
I then feed the charging wires through the drill holes before soldering on the connector. The connector I’m mounting is an XT30 which means I’ll be needing an adaptor to connect the battery pack to the balance charger.
After wiring up the new battery pack, I check and tug all the wires to make sure connections are good. I also use a continuity tester to make sure the connector terminals connect to the expected corresponding battery terminal.
Battery Pack Final Checks
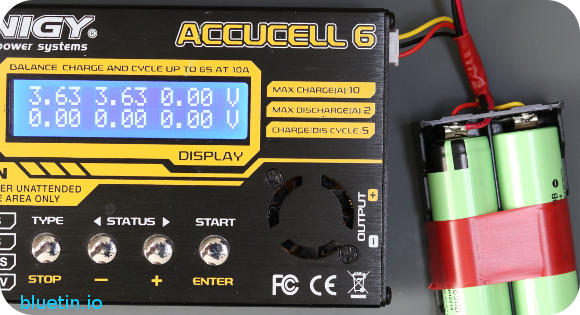
Once initial wire checks are done, Li-ion batteries can now be put in the battery box while observing correct polarity. Connecting the balance cable to the balance charger can provide the balances of the individual cells. With good readings from the charger, it is now time to test balance charging.
You will want to charge the battery pack in a fireproof bag away from flammable materials for safety.
Related Articles
Motor Driver for Raspberry Pi Robot using TB6612FNG – Link.
TB6612FNG Dual DC Motor Driver and Arduino Circuit guide – Link.
Buying Featured Items
The purchase price is going to vary greatly depending on how quickly you want the items. Therefore shop around checking out Amazon, Ebay, Adafruit and local electronic stores.
DISCLAIMER: This feature may contain affiliate links, which means that if you click on one of the product links, I’ll receive a small commission. This commission helps support the website and allows me to continue to make features like this. Thank you for the support!
BANGGOOD
- 3pcs DIY DC 7.4V 2 Slot Double Series 18650 Battery Holder Battery Box With 2 Leads ROHS Certification – Link.
- 5X XT60 Male Female Bullet Connectors Plugs For RC Battery – Link.
- 5 Pairs XT30 2mm Golden Male Female Non-slip Plug Interface Connector – Link.
- 1 Pair XT60 Female Male Plug To XT30 Female Male Plug Connector – Link.
On Closing
I hope you find this article useful – Build a Robot Battery Pack with Li-ion 18650 Cells, please like and share.