
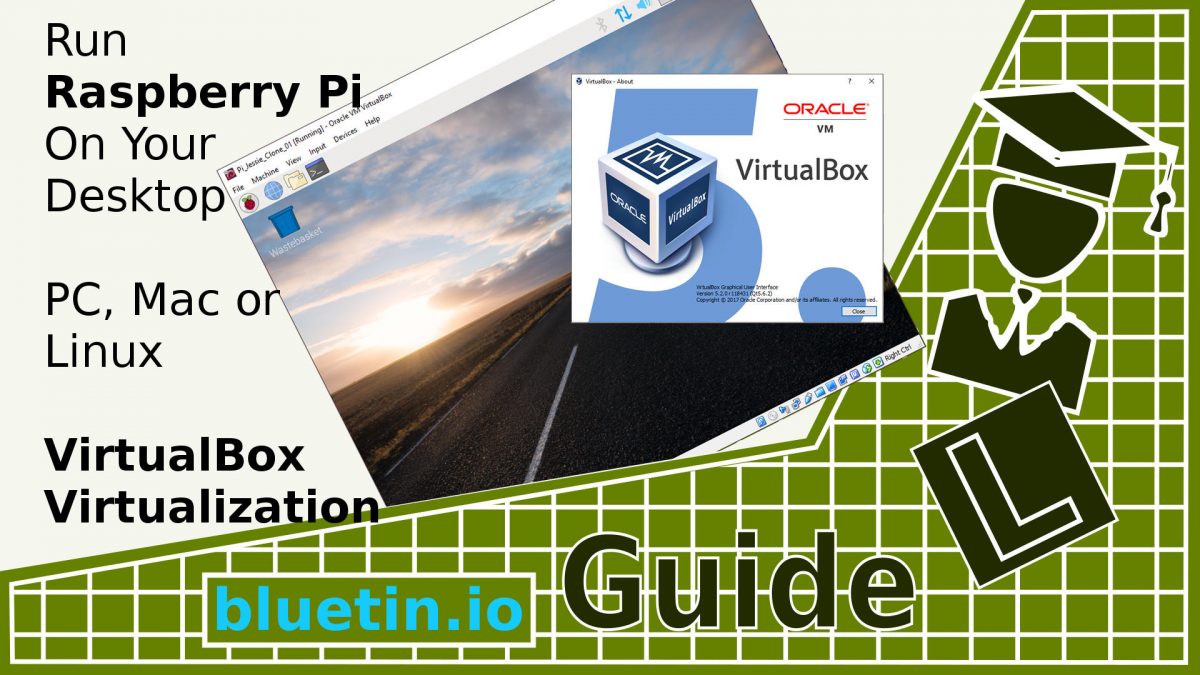
In this guide, I’m going to set-up a Raspberry Pi Raspbian Virtual Machine. I’m going to install VirtualBox, a cross-platform virtualization application that will allow me to run Raspberry Pi Desktop on a PC or Mac. During the set-up, I will also enable support for copy and paste and file sharing between host and virtual machine.
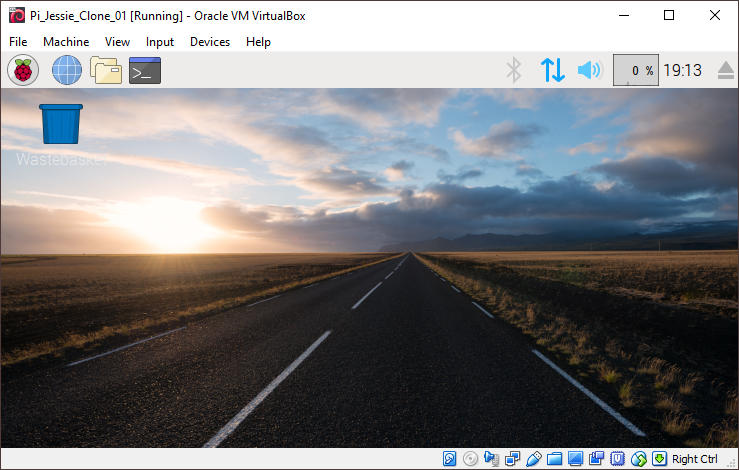
I am going to use VirtualBox, a cross-platform virtualization application, to install and run Raspian x86. This will allow me to use the Raspberry Pi Desktop OS on my personal computer. However, this set-up will not have access to the Raspberry Pi hardware features. Which includes the GPio ports or the Raspberry Pi camera. But USB is supported, and I was able to test the Raspberry Pi controller within the virtual Raspberry Pi set-up.
Raspian Virtual Machine
A lot can be done with the Raspbian virtual machine including setting up an OpenCV environment. Obviously, there are going to be some disadvantages but the virtual machine set-up is not meant to replace the Raspberry Pi. So the advantage of using a Raspian virtual machine is to make it more convenient to develop the Raspberry Pi platform. Ideas created in the virtual environment can eventually be ported to a real Raspberry Pi.
Ideas below will show how I might use a Raspian virtual machine.
- I can create a clean Raspbian virtual machine master, and then create clones from that master as often as I want. So this provides a quick way to get a fresh Raspberry Pi environment to experiment with. It only takes a few minutes to create and delete virtual machine clones.
- I can use virtual machine clones to test new shell scripts. If I always use the same consistent set-up routine for each new Raspberry Pi, for instance, I could automate the set-up routine using shell scripts.
- VM clones are ideal to practice setting up various types of software such as web servers, database servers and so on. I might also want to practice using software tools that my host operating system does not support. I could perform any software task that does not require Raspberry Pi hardware features.
- OpenCV is a lot easier to install on the Raspberry Pi than it is on the Windows operating system. I can run OpenCV on the virtual machine for greater convenience than just running OpenCV on the Raspberry Pi alone.
Setting Up Raspian Virtual Machine
The virtualization software will only work with the Raspberry Pi Desktop edition for this guide, which is currently Debian Jessie as of writing. You will also require at least 10GB of hard disk space to have enough room to install OpenCV on the Raspbian virtual image. You will also need additional hard disk space to create clones from the virtual image master.
To get started you first need to download VirtualBox, which is a powerful x86 and AMD64/Intel64 virtualization application from Oracle. VirtualBox currently runs on Windows, Linux, Macintosh and Solaris, which are referred to as hosts. You may also like to download VirtualBox Extension Pack. This extension pack will give you USB2 and USB3 so that you can access some devices that require them.
DownLoads
- The download page for the VirtualBox software is here.
- Download page for Raspberry Pi Desktop is here.
Virtual Machine Settings summary:
- Select new to create a new virtual hard drive.
- Enter virtual drive name, of Linux type, and Debian(64-bit).
- 1024MB memory size.
- Select the option to create a virtual hard disk now.
- Choose VDI (VirtualBox Disk Image).
- Select dynamically allocated hard drive.
- Use 16GB for the hard drive space.
- Select a hard disk and folder to store the virtual hard disk.
- Virtual hard disk created.
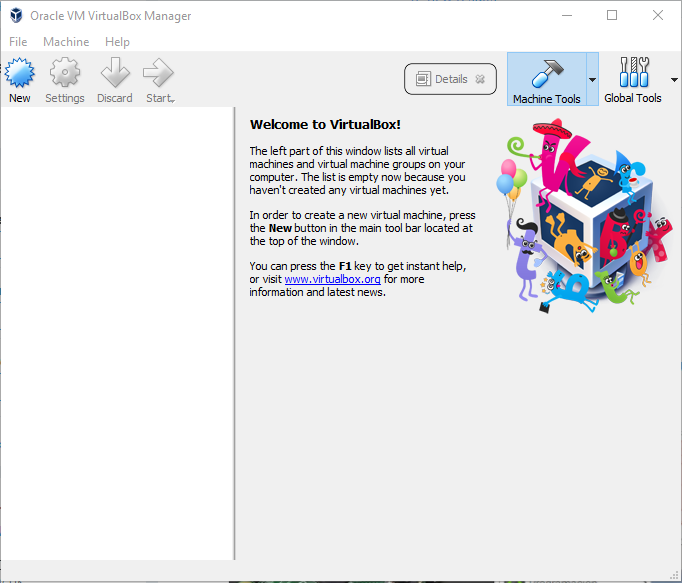
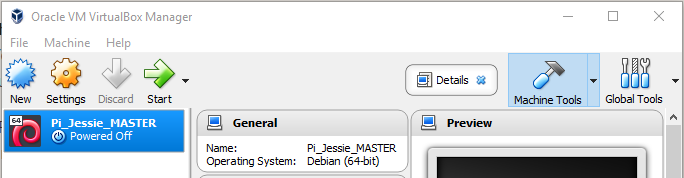
Install VirtualBox followed by VirtualBox Extension Pack. However, installing the extension pack is optional at this point. When you run the VirtualBox application you will be presented with the VirtualBox Manager start screen as below.
Configuring A New Raspbian Virtual Machine
We are going to configure a new Raspian Virtual Machine by assigning a name and setting various parameters. The virtual machine is basically a computer that will run the Raspberry Pi Desktop OS.
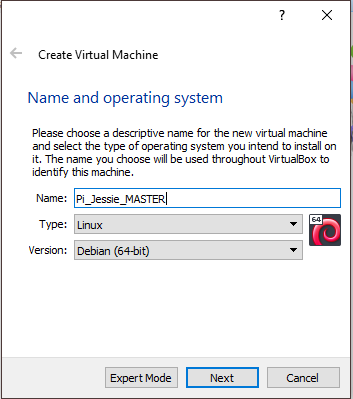
To create a new virtual machine you select New on the top left of the VirtualBox Manager application window. Here you will have the opportunity to name your Raspian Virtual Machine. Since this will be my first Raspbian OS set-up, I want to add the Master keyword. So the name I use, for example, is Pi_Jessie_MASTER. Also, in the other fields, select Linux as type and Debian(64-bit) as the version.
Using the keyword Master will remind me that I want to keep this image as a clean install. Hence, apart from routine package updates, no extra software will be installed. However, if I want to work with a Raspbian virtual machine, I use a clone of the master. consequently, you will always have a fresh Raspain installation available to clone. Select next to move on.
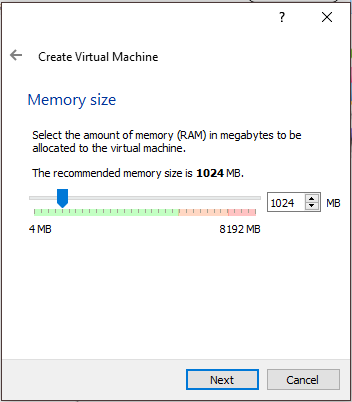
You can set the memory size to match the Raspberry Pi hardware. However, I think the default 1024 MB looks good and chose that. Select next to move on.
Configure Virtual Hard Drive
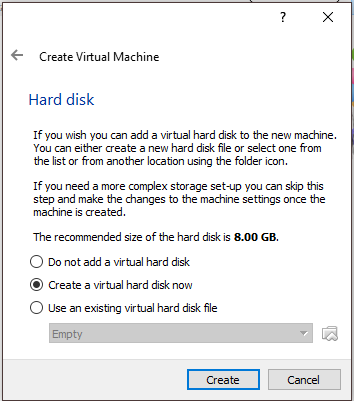
If you are new to this application there is only one option to choose. Select the option to create a virtual hard disk and click create for the next settings.
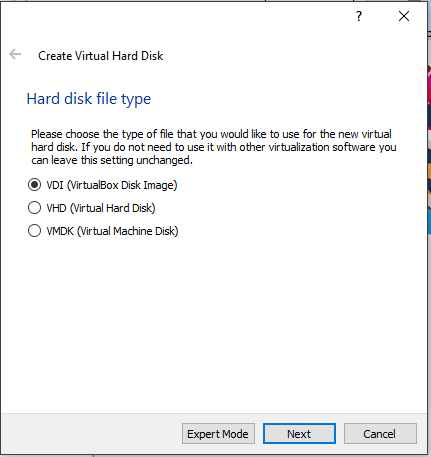
Here you select the hard disk file type. Unless you want compatibility with other virtualization clients then the default is good. choose VDI (VirtualBox Disk Image) and click next.
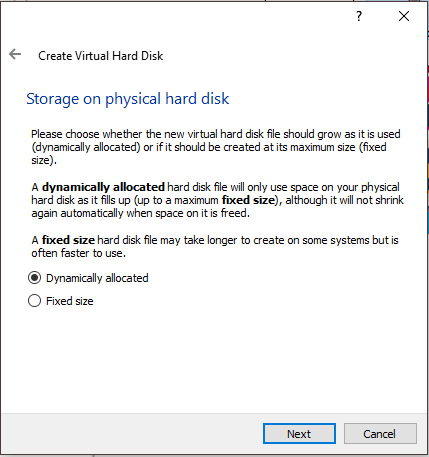
We can dynamically allocate the hard disk size so that we can save host disk space. Which means if we select 16GB for our initial disk size, we might only use 10GB, and as a result, a smaller disk file size. Thus the clones we create will also be the smaller disk file size. Setting a fixed disk size will likely result in redundant hard drive space that can not be used. Select dynamically allocated or fixed size hard drive then click next.
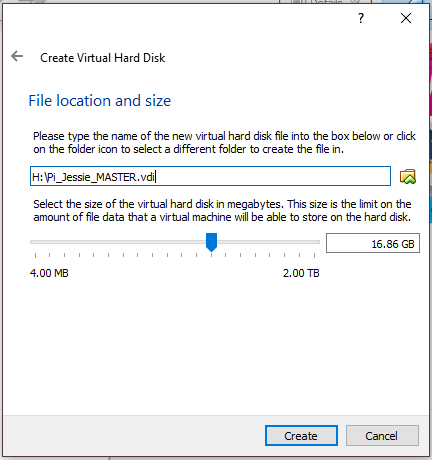
By default, the virtual machine files will save to the user folder on the main hard drive. If you have extra drives on the computer you can choose one of those if there is enough space. I’m choosing to use 16GB for the hard drive space. But since I opted to use dynamically allocated space, the initial file size will be much smaller. Finally, click create, to create a new virtual hard drive.
CPUs For Raspbian Virtual Machine
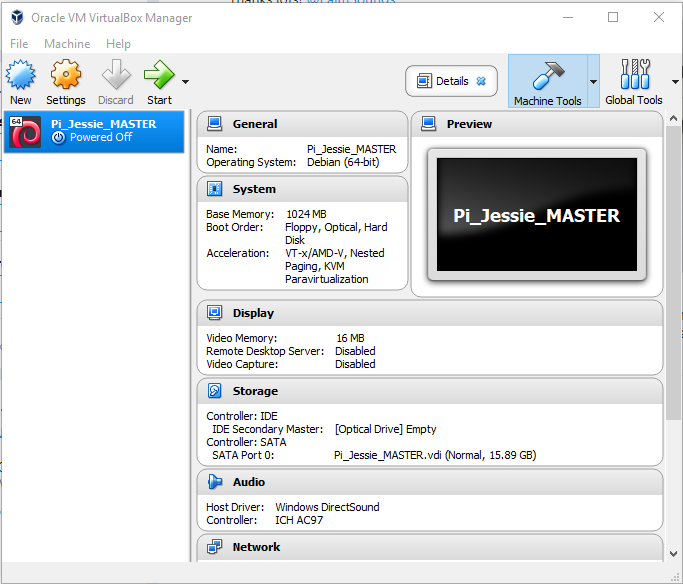
The virtual hard disk is now created and ready to have the Raspbian image installed. All the virtual disks you create will appear in the list on the left. By selecting a virtual disk you will see settings that are currently set in the right pane. Clicking on the title for any of the settings group will open the settings editor window.
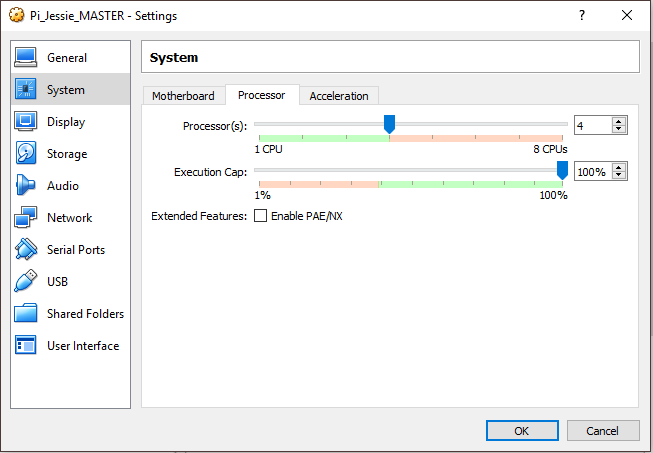
You can assign extra CPUs to the Raspbian virtual environment from the settings dialogue. After selecting the virtual disk you just created, click on settings on the above menu. Then select System from the list on the left, followed by clicking the Processor tab. Here you will see a slider to select the number of CPUs you want to assign.
Raspbian Virtual Machine Installing
Now that the Raspian virtual machine hard disk is ready, we can install the Raspberry Pi Desktop OS. All we need to do is download the desktop OS image file. Then attach the file as a virtual CD drive. When we start the virtual machine, the virtual cd drive will automatically load and execute the Raspberry Pi Desktop OS.
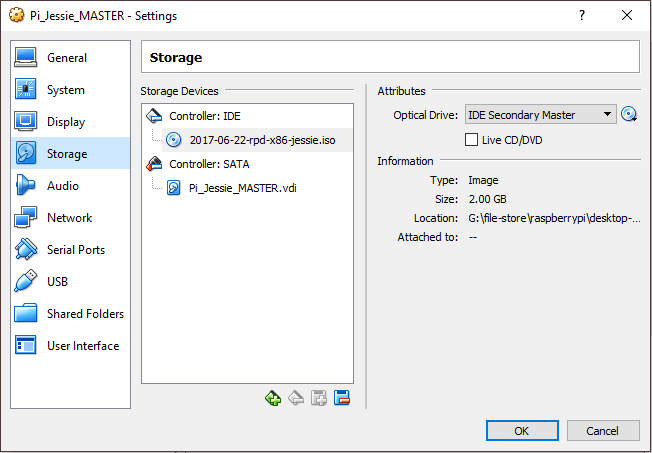
While in settings, select Storage to view Storage Devices and Attributes. Under Storage Devices heading you select CD/DVD drive that branches from the Controller: IDE. Then select the small CD icon next to the Optical Drive drop-down list box under the heading Attributes. After clicking the small CD icon, a drop-down list will appear. From the list select Choose Optical Disk File… Find the Raspberry Pi Desktop OS file that you download from Raspberry Pi foundation site. Once you load the file, you are ready to start the Raspbian Virtual Machine. Click OK to return to the VirtualBox Manager.
Click Start from the above menu after selecting the virtual disk from the list. Another window will open and you will eventually be presented with the installer boot menu.
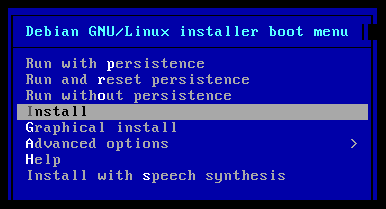
I want to install the Raspberry Pi desktop OS so that the OS will boot from the virtual hard disk when I start it. So I select install from the boot menu. Use the arrow keys on the keyboard to move up and down the menu. Then press enter when selection is made.
During the Raspbian virtual machine installation, there will be some configuration options to choose. When you come to configure disk partitions, note that the configuration is only being made to the virtual hard disk.
Raspbian Virtual Machine Configuration Steps
- Configure the keyboard for the correct keymap to use.
- 1. Partition disks, partitioning method: I select Guided-use entire disk.
- 2. Partition disks, I select the default disk here. There is only one option to select.
- 3. Partition disks, partitioning scheme: All files in one partition.
- 4. Partition disks: Just confirm the disk configuration by pressing enter.
- 5. Partition disks: Another confirmation message appears, I select yes to continue.
- 1. Grub bootloader: Select Yes to install the GRUB boot loader to the master boot record.
- 2. Grub bootloader: I do not want to enter the device manually, So I select the next option which is the virtual disk.
- Finish the Installation: The installation is now complete. Press Enter to continue.
Complete The Raspian Virtual Machine Installation
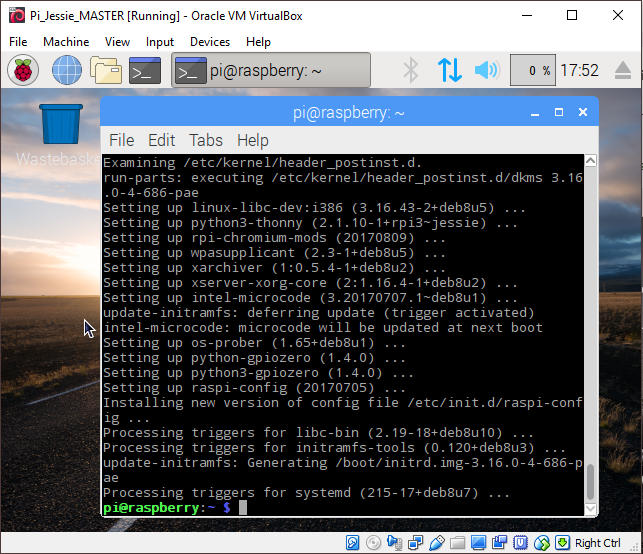
When the installation is complete, the virtual system will reboot and the Raspian OS will load. Thus this will be a good opportunity to update the package lists and make upgrades. So start the terminal program an enter the following commands:
sudo apt-get update
sudo apt-get upgrade
Raspbian Virtual Machine Extra Guest Utilities
These utilities run inside the Raspbian Virtual Machine to provide closer integration and improve interactive performance. So there are three important features we can get which are listed below.
- Copy and paste between host and virtual machine guest.
- Resizable guest OS screen when resizing the virtual machine window.
- Share host folders with the Rasbian virtual machine.
Execute the following commands in the terminal window to enable the above features:
sudo apt-get install virtualbox-guest-dkms
sudo apt-get install virtualbox-guest-x11
sudo apt-get install linux-headers-$(uname -r)
sudo reboot now
After a reboot of the Raspberry Pi desktop, open the terminal window again and enter the following commands:
sudo adduser pi vboxsf
sudo shutdown now
The Raspberry Pi desktop will shut down and close the virtual machine window. We now can add a folder to share through the VirtualBox Manager Settings.
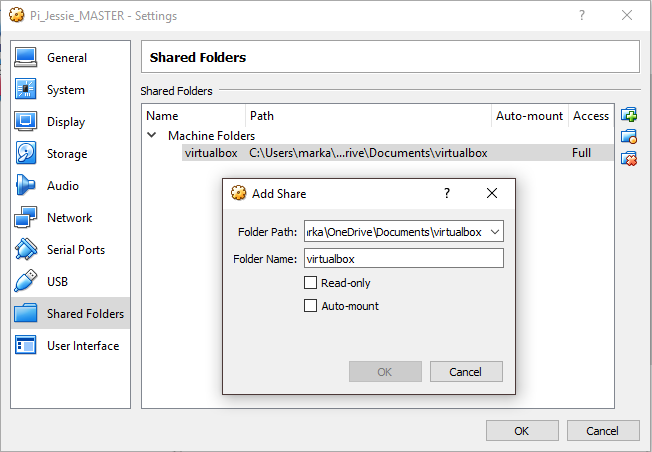
Select a virtual machine from the list and click Settings on the menu bar to open the Settings Window. Choose shared folders from the list, then click the folder-plus icon to add a folder to share. Also, tick the auto-mount option.
The files dropped in the shared folder can be accessed from the Raspberry Pi Desktop virtual machine. Using the Raspberry Pi Desktop File Manager, you can navigate to the shared folder which will have a sf_ prefix on the folder name. Find the shared folder in the media folder starting at the root, for example, /media/sf_virtualbox.
Cloning Raspbian Virtual Machine
Instead of spoiling the new Raspberry Pi set-up, the new set-up can be cloned to make working copies.
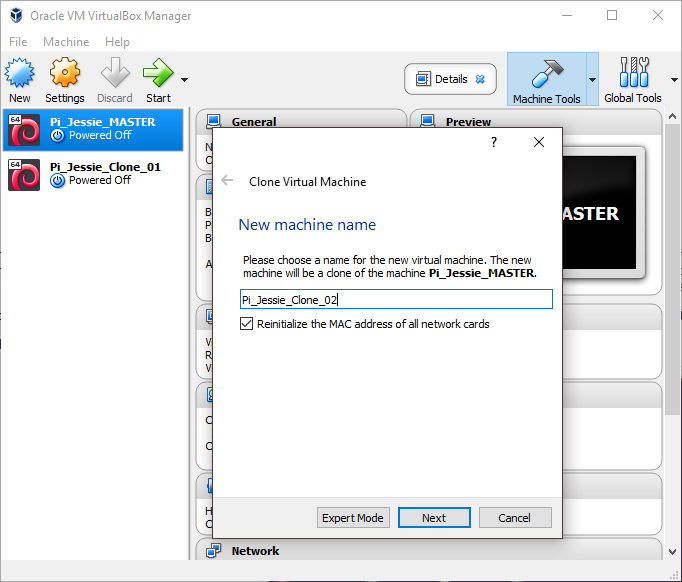
Depending on the speed of the host computer, you can create a clone in just a few minutes. This is many times faster than reinstalling the Raspberry Pi Desktop. You can create and delete as many clones as you want as long as you have enough disk space on the host PC.
You can create a clone by right-clicking, with the mouse, on a virtual machine you want to copy. Then, from the drop-down list, select Clone. Type a unique name for the clone and tick to reinitialize the MAC address of all network cards. Choose full clone after clicking to the next window.
Final Notes
By default, the virtual machine can access the internet if the host computer can access the internet. However, we can’t yet access the virtual machine from the host without further network configuration. This will be covered in a later article.
It is important to properly shutdown the virtual machine as you would with real Raspberry Pi hardware. This will help to avoid file corruption that may prevent the OS from starting.
Related Articles

VirtualBox SSH Network Guide – Raspberry Pi Desktop – Link.
Raspberry Pi Headless Install Without A Display Guide – Link.
Beginners Guide to Raspberry Pi Configuration – Link.
Buying Featured Items
The purchase price is going to vary greatly depending on how quickly you want the items. Therefore shop around checking out Amazon, Ebay, Adafruit and local electronic stores.
UK Searches:
UK Amazon:
US Searches:
US Amazon:
On Closing
I hope you find this article useful – Raspberry Pi Raspbian Virtual Machine on your Desktop. Please like and share.