
In this guide, I provide an overview of the SN-28B terminal crimping tool followed by a quick start user guide. So if you want to do your own custom wiring for connecting electronic modules available for Arduino then this guide is for you.
SN-28B Terminal Crimping Overview
Basically, the SN-28B crimper tool allows me to create my own Dupont style jumper wires of any length. However, I don’t make these jumper wires for use on a breadboard. Instead, I make them for connecting different electronic modules or breakout boards together. Some examples of electronic modules include the following:
- Ultrasonic sensors.
- H-bridge modules.
- Wireless transceiver modules.
- DC to DC buck-boost converters.
- Small dc motors for robots.
- Basically many other modules that exist for the Arduino platform.
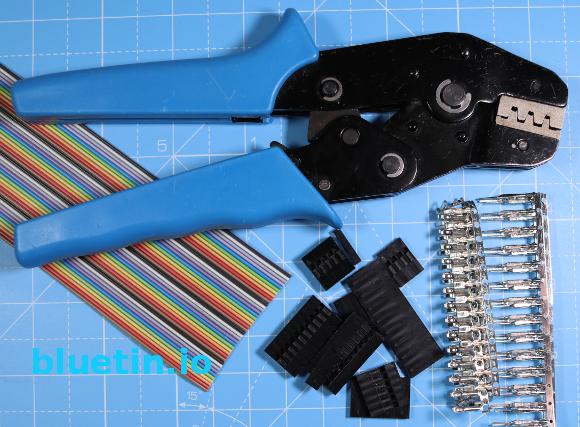
To go with the SN-28B crimper tool I have 2.54mm pitch connector housings with a different number of pin sizes as well as male and female crimp pins. Although the connector housings can be cut down to the number of pins required, it is cheap enough to keep a stock of some common sizes.
Connector Housings and Wire
Below I describe some of the uses of different terminal housing pin sizes:
- 1 Pin housing – you might have a 4 pin terminal connector at one end of the ribbon cable while having 4 separate 1 pin connectors at the other end. Thus ideal for connecting to non-aligned connectors.
- 2 Pin housing – ideal for adding connectors to small dc motors, voltmeters and dc to dc buck-boost converters for instance.
- 3 Pin housing – is ideal to connect linear dc voltage converters or other modules that have an analogue as well as a VCC and GND connections.
- 4 Pin housing – good for connecting serial transceiver modules using UART or I2C.
- 6 Pin housing – Some SPI Arduino compatible displays can use 6 wire ribbon cable connection.
- Other sizes that are not commonly used are 8 and 16 pins, but these sizes are mainly for cutting down to fewer pins where necessary. Also, there are twin row versions in my kit but rarely use them.
If the electronic parts do not already have wires attached, a supply of suitable wire is needed. I generally use AWG 28 multicoloured ribbon cable that is good for up to 1 AMP. However, A slightly heavier cable would be a better match for these header pins.
SN-28B Quick Start User Guide
Tools You Need
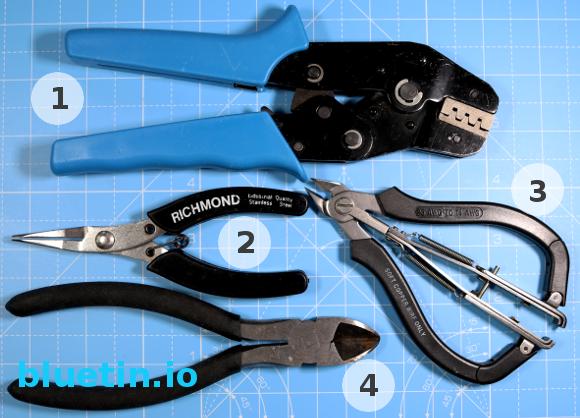
There are four types of tools you need including the SN-28B Crimper. However, this may extend to five tools depending on some tool choices you make. So check the list below to find out what role each tool plays when assembling terminal connectors.
- The terminal crimping tool I use uses the code SN-28B, using that as a search term on google will give you plenty of purchasing options and prices. Check below for a quick usage guide.
- Often the SN-28B do not squeeze the terminal pin wire clamps tight enough. So needle nose pliers are handy for squeezing the part of the pin that will not fit in the terminal housing. Also in the usage guide below.
- You will require a wire cutter and wire stripping tool. You may need to experiment with different wire stripping tools to find the best that suite the wires you use. The combination wire cutter and stripper pictured above do not strip AWG 28 wire reliably.
- Terminal male and female header pins are normally supplied on a long metal strip. therefore cutting pliers are required to cut through this strip. Initially cutting the strip between the terminal pins before removing the pins from the strip is recommended. Hence this will leave a small tab for your fingers to hold while positioning the pin inside the crimper jaw.
SN-28B User Guide
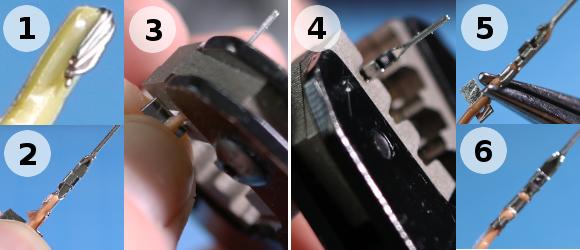
To help keep the terminal header pin crimping process running as smooth as possible, here’s a quick step by step guide. This guide is illustrated in the image above using the SN-28B crimping tool, AWG 28 ribbon cable, needle nose pliers and the male terminal header pin.
Step 1, preparing the wire:
For me it is usual practice, when using fine wire like AWG 28 ribbon cable, to fold the bare wire core over the wire insulator. Because this provides more clamping pressure in the terminal pin wire clamp. Hence a better wire connection between the wire core and the terminal pin. However, for heavier thicker wire, folding the core over the wire insulator may not be necessary.
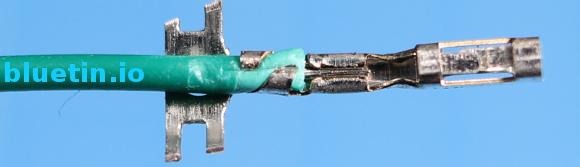
Furthermore, care will be required over the amount of bare wire core you insert into the female header pin. Because having the bare wire core too long in the female pin will obstruct the male and female pin connection.
Step 2, preparing the terminal pin:
Cutting through the metal strip between the terminal pins will leave you a small tab for you to hold between your fingers. Sandwich the wire between your thumb and the pin tab while making sure that the wire is in position correctly in the pin – as shown in the above image at step 2.
Steps 3 and 4, crimping the terminal pin:
Firstly, squeezing the larger terminal pin clamp over the wire will make it easier to insert the pin into the SN-28B upper jaw. Just pressing the larger clamp (nearest to the pin tab) with your fingers will be enough to make a difference.
While inserting the terminal pin onto the clamp jaw the tab, on the pin, needs to be butting right up against the side of the SN-28B upper jaw. This is especially important when crimping female pins because damage can occur to the pin if not inserted far enough. Hence damage to the terminal pin could prevent the pin locking inside the terminal housing.
So once the pin is in position inside the SN-28B jaw, fully squeeze the tool handle all the way to crimp the wire to the terminal pin.
Steps 5 and 6, finishing off:
Step 5 in the image above shows the terminal pin being lightly squeezed with needle nose pliers. This is to illustrate the approximate area of the pin that snags the terminal housing while inserting the pin. Squeezing the pliers too tightly will consequently misshape the pin.
Remove the tab from the pin, and then insert the pin into the terminal housing. If there is too much resistance preventing the pin from fully connecting to the terminal housing, use the pliers to lightly squeeze the offending part of the pin.
Related Articles

Jumper Wires Made With SN-28B Crimping Tool Guide – Link.
Buying Featured Items
The purchase price is going to vary greatly depending on how quickly you want the module. Therefore shop around checking out Amazon, Ebay and local electronic stores.
UK Searches:
UK Amazon
- Terminal Pin Crimping Tool – Link.
- Dupont Terminal Pins and Terminal Housings – Link.
- Rainbow Flat Ribbon Cable – Link.
- Needle Nose Pliers – Link.
- Side Cutting Pliers – Link.
- Wire stripper Pliers – Link.
US Searches:
US Amazon
- Terminal Pin Crimping Tool – Link.
- Dupont Terminal Pins and Terminal Housings – Link.
- Rainbow Flat Ribbon Cable – Link.
- Needle Nose Pliers – Link.
- Side Cutting Pliers – Link.
- Wire stripper Pliers – Link.
Thank you for your interest in this feature – SN-28B Terminal Pin Crimping Tool Guide. Please share on social media.